Implementing failover clusters
Having prepared our Hyper-V hosts, we will now create a Failover Cluster using PowerShell. I'm assuming that your hosts are installed, the storage and network connections are prepared, and the Hyper-V role is already active utilizing up-to-date drivers and firmware on your hardware:
First, we need to ensure that the server name, date, and time of our hosts are correct. Time and time zone configurations should occur via Group Policy.
For automatic network configuration later on, it's important to rename the network connections from the defaults to their designated roles using PowerShell, as shown in the following commands:
Rename-NetAdapter -Name "Ethernet" -NewName "Host"
Rename-NetAdapter -Name "Ethernet 2" -NewName
     "LiveMig"
Rename-NetAdapter -Name "Ethernet 3" -NewName "VMs"
Rename-NetAdapter -Name "Ethernet 4" -NewName
     "Cluster"
Rename-NetAdapter -Name "Ethernet 5" -NewName
     "Storage"
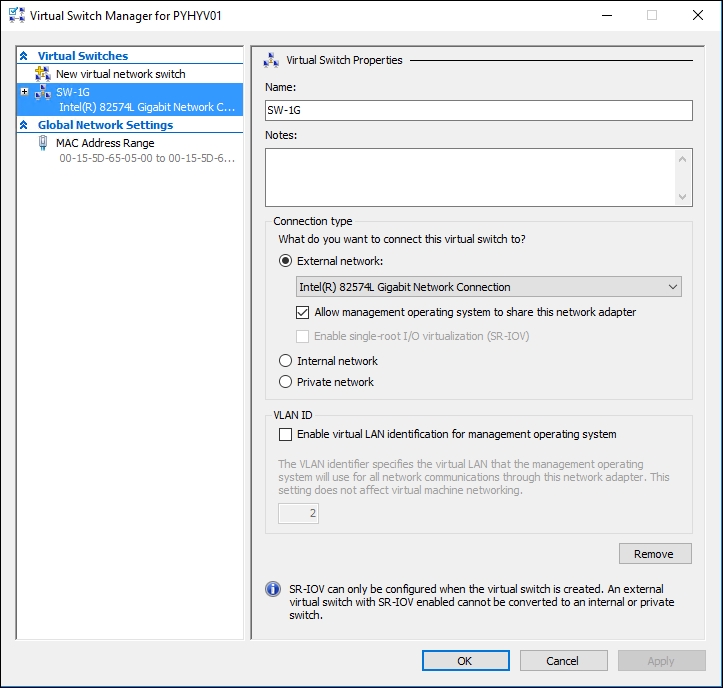
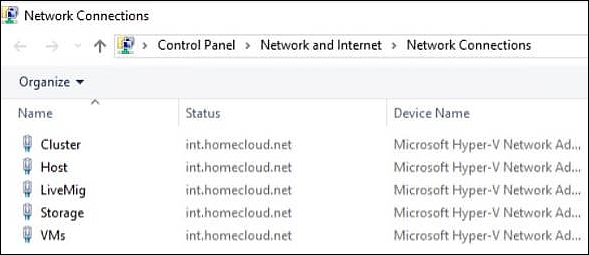
The Network Connections window should look like the following screenshot:
Hyper-V host Network Connections
Next, we need to set the IP configuration of the network adapters. If you are not using DHCP for your servers, manually set the IP configuration (different subnets) of the specified network cards. A great blog post on how to automate this step is available at http://bit.ly/Upa5bJ.
Next, we need to activate the necessary Failover Clustering features on both of our Hyper-V hosts:
Install-WindowsFeature -Name Failover-Clustering
     -IncludeManagementTools `
     -Computername pyhyv01, pyhyv02
Before actually creating the cluster, we will launch a cluster validation cmdlet via PowerShell:
Test-Cluster pyhyv01, pyhyv02
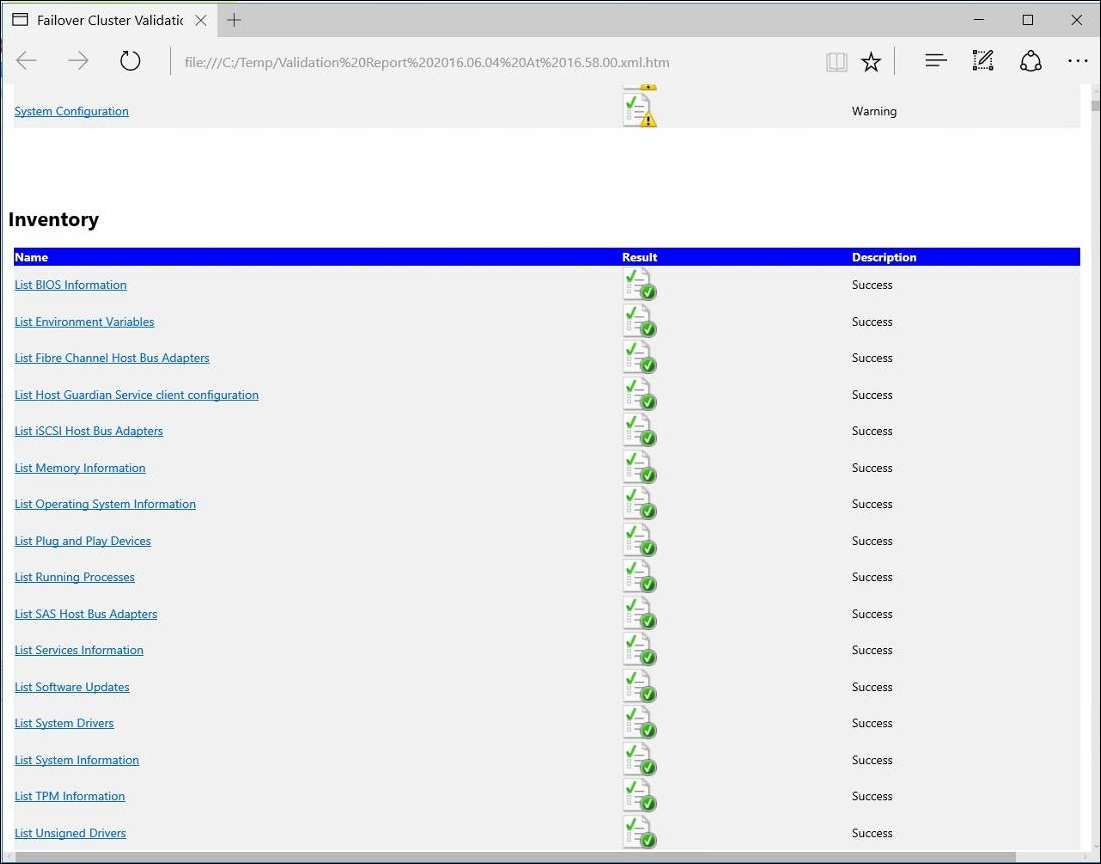
Open the generated .mht file for more details, as shown in the following screenshot:
Cluster validation
As you can see, there are some warnings that should be investigated. However, as long as there are no errors, the configuration is ready for clustering and fully supported by Microsoft. However, check out Warning to ensure that you won't run into problems in the long run. After you have fixed potential errors and warnings listed in the Cluster Validation Report, you can finally create the cluster as follows:
New-Cluster
-Name CN=Cluster-Hyv01,OU=Servers,DC=int,DC=homecloud,DC=Net
-Node Pyhyv01, Pyhyv02 `
-StaticAddress 192.168.1.49
This will create a new cluster named Cluster-Hyv01, consisting of the nodes Pyhyv01 and Pyhyv02 and using the cluster IP address 192.168.1.49.
This cmdlet will create the cluster and the corresponding Active Directory object in the specified OU. Moving the cluster object to a different OU later on will not be a problem at all; even renaming it is possible when done the right way.
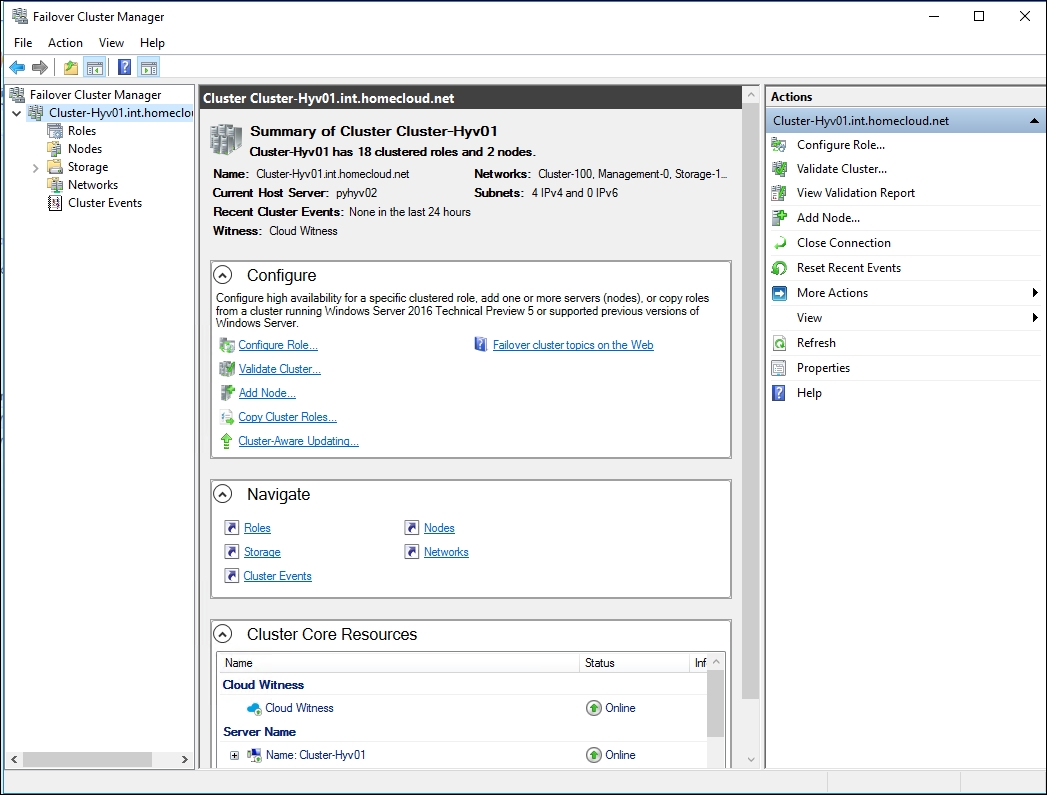
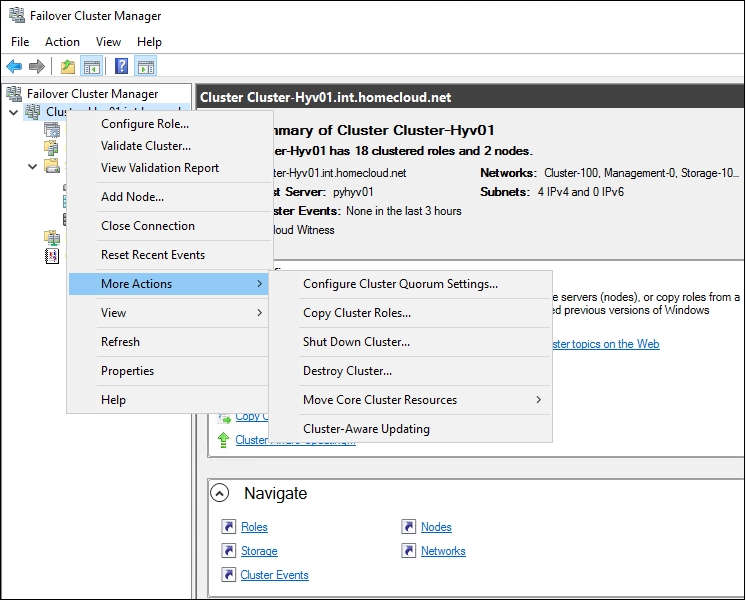
After creating the cluster, when you open the Failover Cluster Manager console, you should be able to connect to your cluster, as shown here:
Failover Cluster Manager
You will see that all your cluster nodes and Cluster Core Resources are online. Rerun the Validation Report and copy the generated .htm files to a secure location if you need them for support queries. Keep in mind that you have to rerun this wizard if any hardware or configuration changes occur in the cluster components, including any of its nodes.
The initial cluster setup is now complete and we can continue with the post-creation tasks.
The quorum is a very important part of a cluster. The quorum helps to maintain the data integrity and avoids split-brain situations. If the network connections between the cluster nodes fail, a cluster node in an even-node setup would have no information if it is part of the isolated area through the outage and has to shut down all cluster services. If it is in the remaining part of the network, it would have to take over cluster services being offline due to the outage. For a successful vote determining which node or nodes are to take over the production service, a total of more than 50 percent of all cluster nodes will need to communicate. If, like in our situation with a two-node cluster, not more than 50 percent of the nodes are available, the node shuts down all its cluster services. In our scenario, both nodes stop all services and our cluster is completely offline to protect us from a split-brain situation. A quorum is another instance of getting to vote and ensuring that a majority of cluster resources are available to do a successful vote. In our configuration, the smallest storage volume got assigned as a quorum automatically. That's why we created a 1 GB LUN earlier. Using this LUN as a quorum ensures that there is a majority of votes available in an event that partitions an even-node cluster, such as a network outage.
In Windows Server 2012, Microsoft brought in Dynamic quorum, which enables assigning votes to a node dynamically to avoid losing the majority of votes and so that the cluster can run with one node (known as the last-man standing). Dynamic quorum works great when the failures are sequential and not simultaneous. So, for a stretched cluster scenario, if you lose a room, the failure is simultaneous and the dynamic quorum does not have the time to recalculate the majority of votes; this is why the witness should be placed in a third room.
The dynamic quorum has been enhanced in Windows Server 2012 R2. Now, the dynamic witness is implemented. This feature calculates whether the quorum witness has a vote. There are two cases, which are as follows:
If there is an even number of nodes in the cluster with the dynamic quorum enabled, the dynamic witness is enabled on the quorum witness and so the witness has a vote
If there is an odd number of nodes in the cluster with the dynamic quorum enabled, the dynamic witness is enabled on the quorum witness and so the witness does not have a vote
So, since Windows Server 2012 R2, Microsoft recommends you always implement a witness in a cluster and let the dynamic quorum decide for you. The dynamic quorum has been enabled by default since Windows Server 2012.
A witness can either be a logical disk, a file share, or, since Windows Server 2016, a cloud witness. There are several reasons why you should prefer a disk witness over a file share witness if possible; for instance, the disk-based witness will host a complete copy of the cluster database whereas the file share witness won't. The cloud witness can also be a good option in the case of a stretched cluster between two rooms. A cloud witness brings you an external location for the witness at a low cost.
With the recent version of Hyper-V, you won't have to think about when to choose a quorum and how to configure it. You just specify a disk witness, if available, or a file share; otherwise, Failover Clustering automatically configures the necessary settings, regardless of the number of nodes. If you are currently using a two-node cluster and plan to add more cluster nodes later, you won't have to change the quorum model later. There are options to change the vote counts of the various resources, and the best practice is not to change them in typical cluster configurations. Quorum changes can occur online, and we can achieve this through PowerShell:
Set-ClusterQuorum -NodeAndDiskMajority "Cluster Disk
    2"
The preceding line represents Cluster Disk 2 as the label of the cluster resource. If you are using a file share witness, use the following option:
Set-ClusterQuorum -NodeAndFileShareMajority
    \\File01\Share01
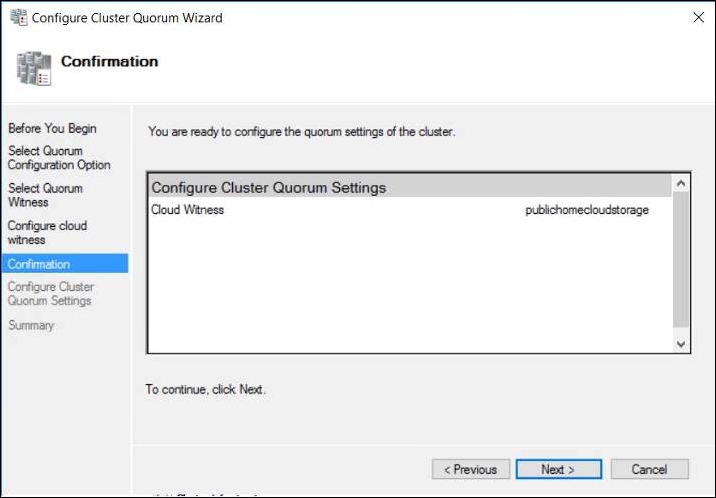
To finish, if you want to use a cloud witness, use the following PowerShell cmdlet:
Set-ClusterQuorum -CloudWitness
    -AccountName StorageAccountName>
    -AccessKey <AccessKey>
Cluster Quorum Wizard
Live migration configuration
Live migration describes the ability to move running virtual machines between Hyper-V hosts. Since Windows Server 2012, this capability is not an exclusive cluster feature anymore, but most of the time they are utilized inside a cluster. You can use live migrations between standalone hosts or between different clusters as well; a shared-nothing live migration will occur, moving not just the RAM of the virtual machine but all of its virtual hard disks, which may consume a lot of network bandwidth and time. Typically, shared-nothing live migrations are used in migration processes and not in day-to-day work.
A live migration of virtual machines occurs every time a planned failover is executed on a Hyper-V cluster. The RAM of the virtual machine is synchronized between the nodes; the handles for the virtual machine configuration and its virtual hard disks are then failed-over to the new host. It's one of the most widely used features in Hyper-V, but often configured incorrectly.
An important aspect of the live migration process is the machine-based authentication. CredSSP is the default authentication protocol in Windows Server 2016. It is easy to use, but it's not the most secure solution and not recommended for production systems. If only one system gets compromised in the chain of delegation, all systems used in the CredSSP environment are compromised as well. Besides that, if you are using CredSSP for live migrations, you will have to log on to the source host first to initiate the migration process due to the one-hop limitation of CredSSP.
If your Hyper-V hosts are part of the same Active Directory domain—and in most cases they will be—you can use the Kerberos protocol for live migration authentication, which offers more security and gets around the limitations of CredSSP. Furthermore, it lets you define granular limits where the account credentials can be used. Use PowerShell to set constraint delegations on a system with Active Directory Management tools installed for all Hyper-V hosts involved, with the following script:
$Host = "pyhyv01"
$Domain = "int.homecloud.net"
Get-ADComputer pyhyv01 | Set-ADObject -Add @{"msDS-AllowedToDelegateTo"="Microsoft Virtual System Migration Service/$Host.$Domain", "cifs/$Host.$Domain","Microsoft Virtual System Migration Service/$Host", "cifs/$Host"}
Be sure to reboot the hosts afterwards so that this configuration can become active.
However, this will just allow pyhyv01 to delegate its credentials to pyhyv02. You have to do this vice versa on your two-node cluster. For bigger clusters, there is a script that enables all combinations for all your Hyper-V hosts (put them in a single OU, the best practice for many reasons) at http://bit.ly/1hC0S9W.
After we have prepared our Active Directory for Kerberos constraint delegation, we will activate incoming and outgoing live migrations for our Hyper-V hosts:
Enable-VMMigration -Computername pyhyv01, pyhyv02
Set-VMHost -Computername pyhyv01, pyhyv02
    -VirtualMachineMigrationAuthenticationType Kerberos
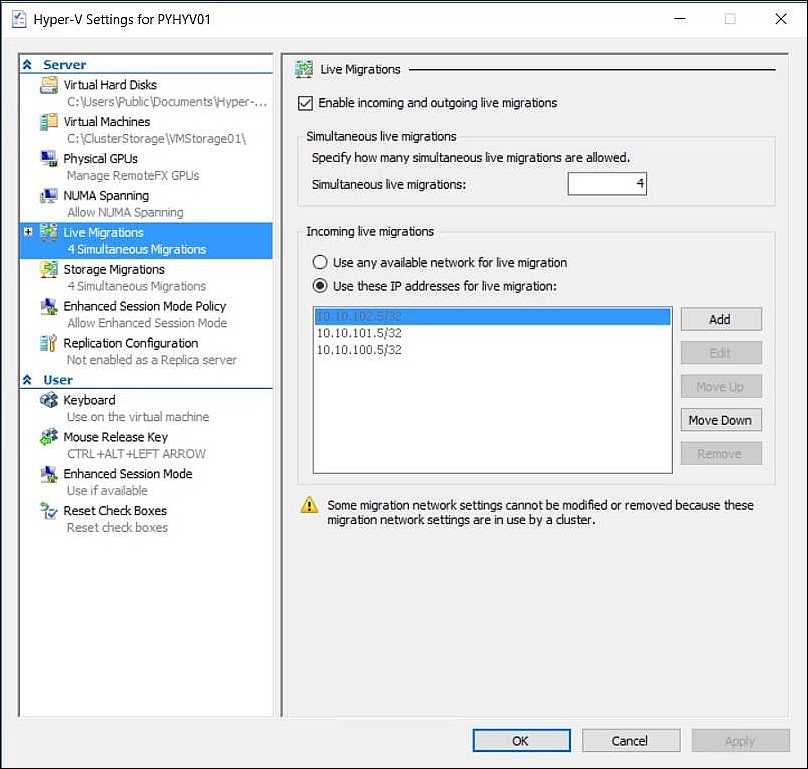
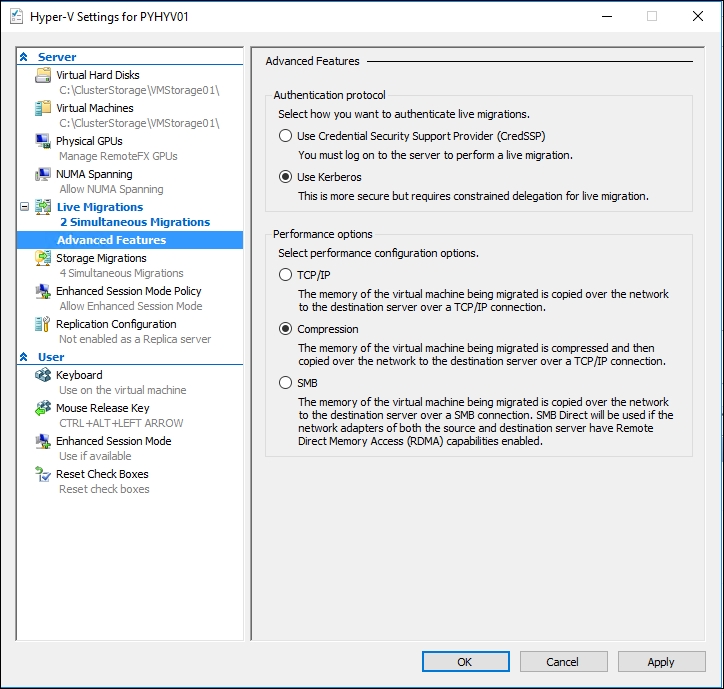
Live migrations are enabled using compression by default. RAM will be compressed to a ZIP-like archive before transmission and extracted on the target host. This is a great setting if you are using 1 GB/s NICs for live migration as it uses spare CPU cycles to compress live migrations to speed up the transfer. If you are using 10 GB/s network connections, switch live migrations to SMB3 for even better performance. Also, we increase the limit for continuous live migrations from two (great for 1 GB/s) to four simultaneous live migrations:
Set-VMHost -Computername pyhyv01, pyhyv02
    -MaximumVirtualMachineMigrations 4
    -MaximumStorageMigrations 4
    -VirtualMachineMigrationPerformanceOption SMBTransport
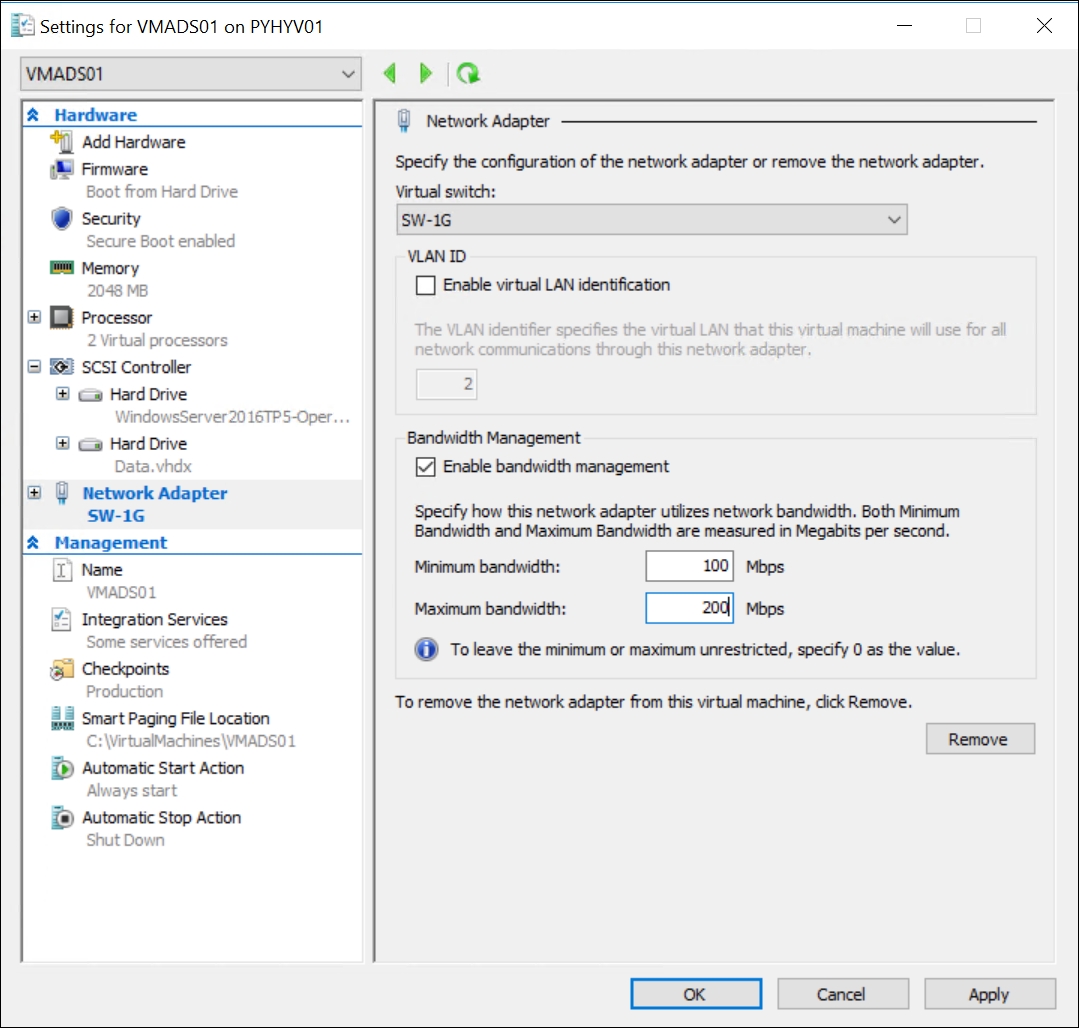
You can also configure these settings through the GUI of every cluster node, as shown here:
Live Migration options
Use the following command and later switch back to the defaults, if needed:
Set-VMHost -Computername pyhyv01, pyhyv02
    -MaximumVirtualMachineMigrations 2
    -MaximumStorageMigrations 2
    -VirtualMachineMigrationPerformanceOption Compression
In the GUI, the preceding command will reflect the changes, as shown here:
Advanced live migration options
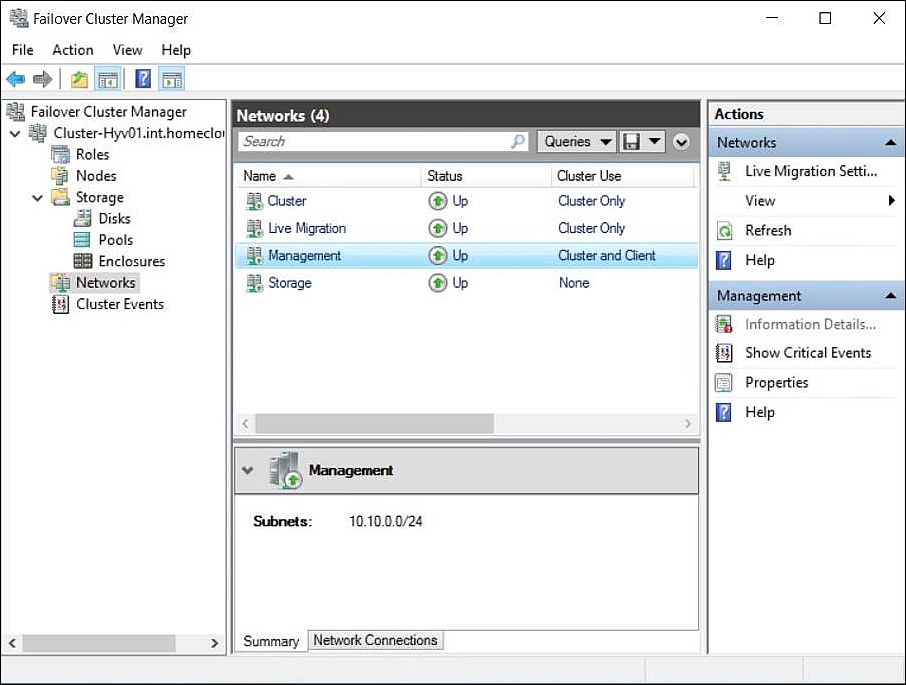
The last setting for preparing live migrations is to choose the network for live migration. By default, all available networks are enabled for live migration. We don't change that. If our live migration network is unavailable and we quickly need to free up a host, we will use other available networks as well; however, by specifying a lower priority (the default is greater than 5.000) to our live migration network, we ensure it is preferred for live migrations:
Set-VMMigrationNework 192.168.10.* -Priority 4.000
(Get-ClusterNetwork -Name "Live-Migration").Role = 1
Live migration settings
We also set the basic configuration for the other cluster networks, as follows:
(Get-ClusterNetwork -Name "Management ").Role = 3
Set-VMMigrationNework 192.168.10.* -Priority 4.000
(Get-ClusterNetwork -Name "Cluster").Role = 1
(Get-ClusterNetwork -Name "Cluster").Metric = 3.000
(Get-ClusterNetwork -Name "Storage").Role = 0
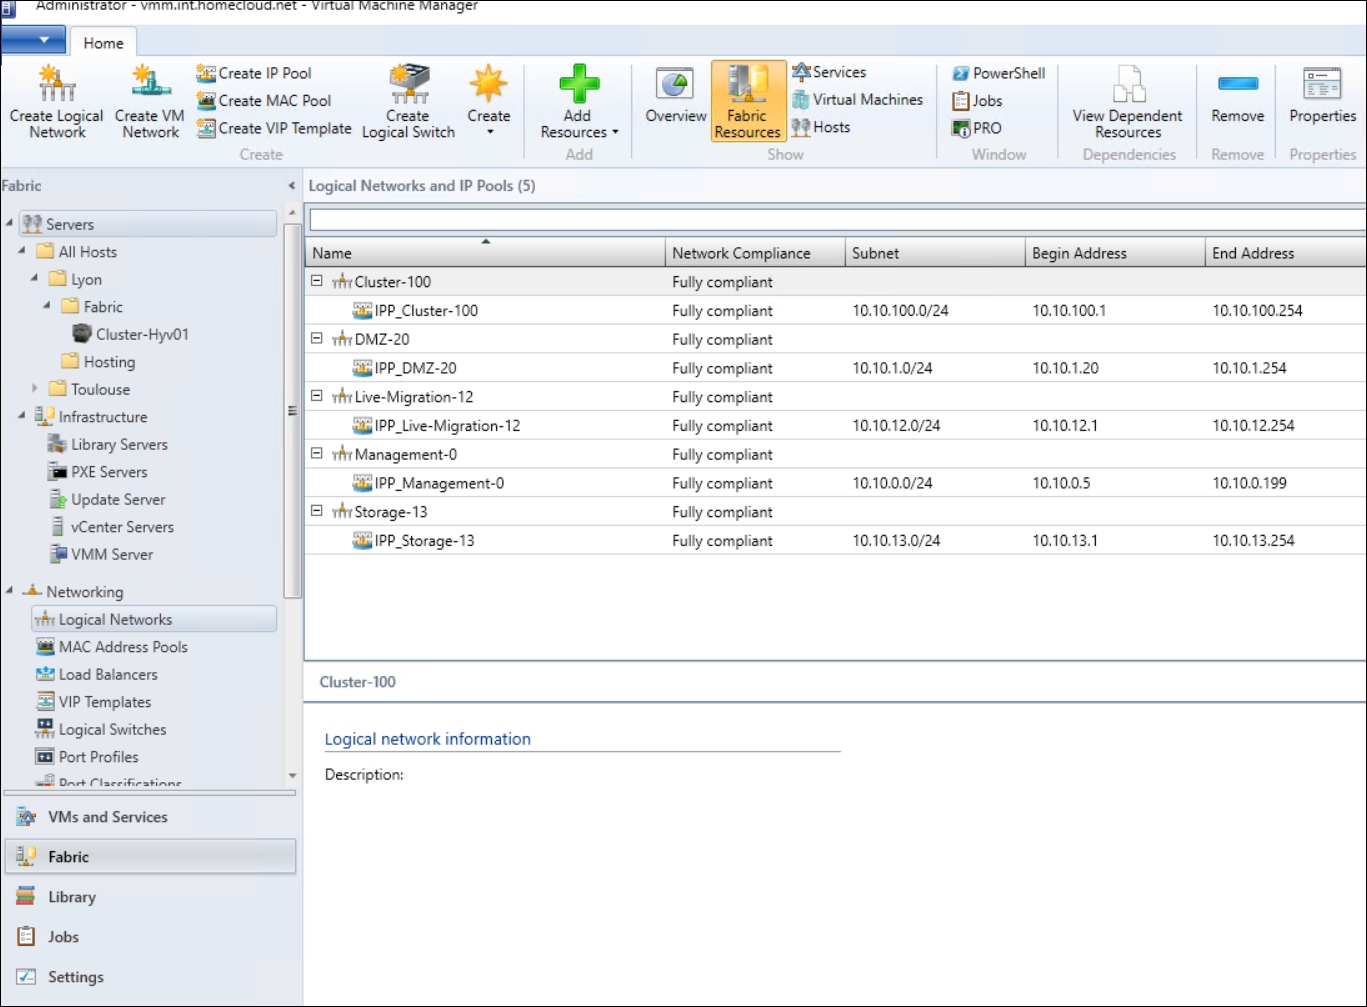
The final network configuration should now look like the following screenshot:
Cluster network configuration
After that configuration, we are ready to initiate our first live migration. To do this, simply execute the following on our first host:
Move-VM "VM01" Pyhyv02
If you want to live migrate all virtual machines from one host to another, use the following cmdlet:
Suspend-ClusterNode -Name Pyhyv01 -Target Pyhyv02 -
    Drain
We are now finished with the configuration of our host cluster. For more advanced monitoring and tuning configurations for Failover Clusters, refer to Chapter 7, Hyper-V Performance Tuning.
You are now ready to test your cluster configuration before putting it into production. Power off a running cluster node hosting virtual machines by removing the power cables and see what's happening to your cluster. Do not use the Shutdown command or the buttons on the server as this would not be a real-life test.
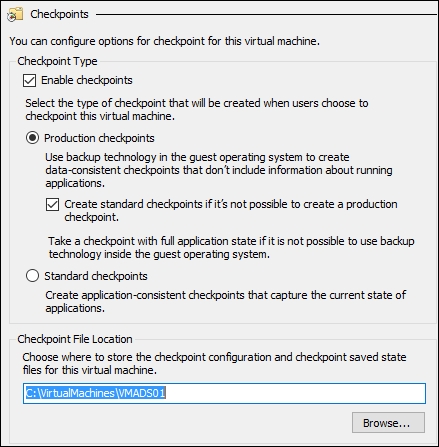
Prior to Windows Server 2016, it was not easy to start a VM in the chosen order because it was based on priority (low, medium, and high) and/or an automatic startup delay in second.
Since Windows Server 2016, we can start a VM or a group of VMs in the chosen order by implementing dependencies between them. A group can hold a single VM or multiple VMs. This is why I recommend you always create a group even if a single VM belongs to a group. If later you want to add a VM to a step that does not involve a group in the VM start ordering plan, you have to remove the dependencies, create a group, add the VMs to the group, and again create dependencies. Instead, if you have created only groups, you just have to add the VM to a group.
The following example will create three groups called SQLServers, VMMServers, and OMGServers. The VMMServers and OMGServers groups will be dependent on the SQLServers group. To create the groups, just run the following PowerShell cmdlet:
New-ClusterGroupSet -Name SQLServers
New-ClusterGroupSet -Name VMMServers
New-ClusterGroupSet -Name OMGServers
The following PowerShell cmdlet configure the groups to be ready when the group has reached an online state. This means that the VMs in the dependent group will not start until the dependent group is online:
Set-ClusterGroupSet -Name SQLServers -StartupSetting Online
Set-ClusterGroupSet -Name VMMServers -StartupSetting Online
Set-ClusterGroupSet -Name OMGServers -StartupSetting Online
Now, create the dependencies between SQLServers and VMMServers, then between SQLServers and OMGServers:
Add-ClusterGroupSetDependency -Name VMMServers -
    ProviderSet SQLServers
Add-ClusterGroupSetDependency -Name OMGServers -
    ProviderSet SQLServers
Finally, add the related VMs to the groups:
Add-ClusterGroupToSet -Name VMVMM01 -Group VMMServers
Add-ClusterGroupToSet -Name VMVMM02 -Group VMMServers
Add-ClusterGroupToSet -Name VMSQL01 -Group SQLServers
Add-ClusterGroupToSet -Name VMSQL02 -Group SQLServers
Add-ClusterGroupToSet -Name VMOMG01 -Group OMGServers
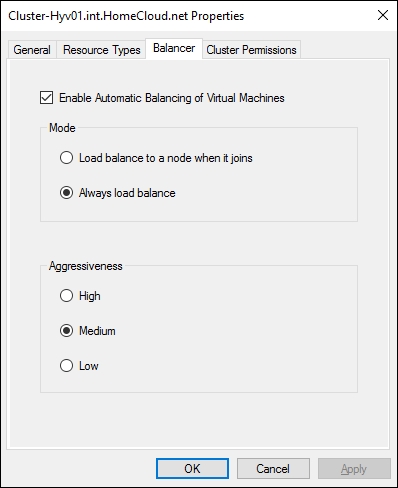
Node fairness is an enhancement of the Failover Clustering feature in Windows Server 2016. It enables balancing virtual machines across the cluster node. It is enabled by default. If you manage your cluster from System Center Virtual Machine Manager, this feature is disabled for the benefit of dynamic optimization:
Node fairness configuration
You can configure the aggressiveness and the behavior of the automatic balancing using PowerShell. Before using cmdlet to configure these settings, it is important to understand each value. For aggressiveness, you can refer to the following table:
For the automatic balancer behavior, you can refer to these values:
To change the default value of these settings, you can run the following PowerShell cmdlet:
(Get-Cluster).AutoBalancerLevel = 3
(Get-Cluster).AutoBalancerMode = 1
There are no best practices for these settings. It depends on your application and whether you want the system to manage VM balancing. However, I recommend you to avoid being too aggressive because every 30 minutes the system can choose to migrate the VM.
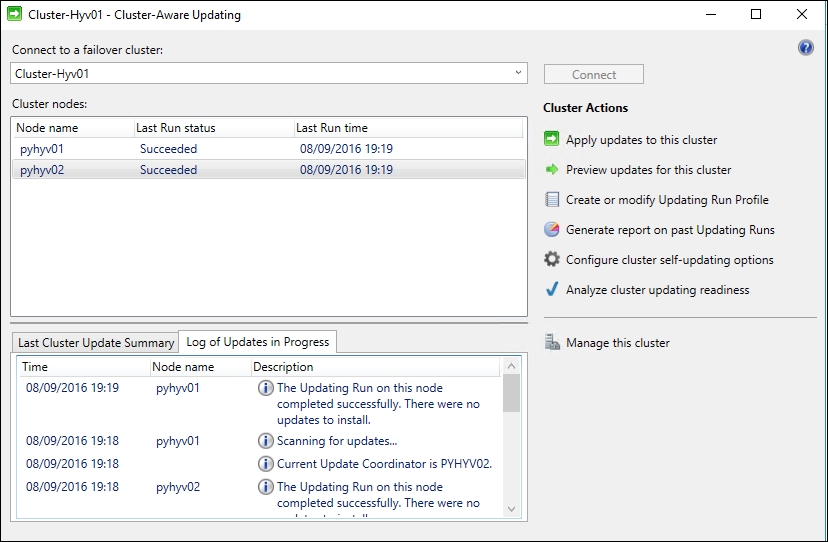
Since you can move running workloads between cluster nodes without affecting production application performance, we will now add Cluster-Aware Updating (CAU), allowing our Hyper-V cluster to install updates by itself. This is a must-have configuration to ensure low maintenance operations for your Hyper-V clusters. CAU will automatically download and install updates to all cluster nodes utilizing live migrations.
In this way, we can update our cluster any time of the day without the need for service downtime. Execute the following cmdlet on one of the cluster nodes:
Add-CauClusterRole -ClusterName Cluster-Hyv01 -Force -
    CauPluginName
    Microsoft.WindowsUpdatePlugin -MaxRetriesPerNode 3 -
    CauPluginArguments @{
    'IncludeRecommendedUpdates' = 'True' } -StartDate
    "5/6/2014 3:00:00 AM" -
    DaysOfWeek 4 -WeeksOfMonth @(3) -verbose
Cluster-Aware Updating Console
You can even utilize an existing WSUS-Server as updating clusters has never been easier. Additional guidance is available for CAU in the Altaro blog at http://bit.ly/Vl7y24.
After creating a Hyper-V Failover Cluster on the host level, it is now time to create a guest cluster. A guest cluster is also a Failover Cluster and works the same way as our host cluster; however, its hosting applications are on top of operating systems instead of virtual machine workloads. A guest cluster is used in conjunction with a host cluster to ensure an even higher availability. Do not create guest clusters unless you are already using a host cluster; it won't increase availability to your services in a hardware failure scenario. However, they are great for planned failovers for maintenance purposes on one node.
The basic concepts and cluster creation are identical to the host cluster, that is running, the Cluster Validation Wizard successfully in order to receive support. However, with two running VMs hosting the same service, that is, a production ERP application, you should avoid running these two VMs on the same physical node on your Hyper-V cluster. You can achieve this using anti-affinity rules that ensure the VMs are placed on different hosts. This is possible via System Center Virtual Machine Manager (refer to Chapter 7, Hyper-V Performance Tuning) or with PowerShell. It is not possible with Failover Cluster Manager GUI. We will continue with the PowerShell approach for now. To create a new anti-affinity rule, execute the following commands:
(Get-ClusterGroup ERP-VM1).AntiAffinityClassNames =
    "GuestClusterERP1"
(Get-ClusterGroup ERP-VM2).AntiAffinityClassNames =
    "GuestClusterERP1"
These VMs won't be placed on the same host if possible. Check your current anti-affinity rules affecting a virtual machine by executing the following command:
Get-ClusterGroup VM1 | fl anti*
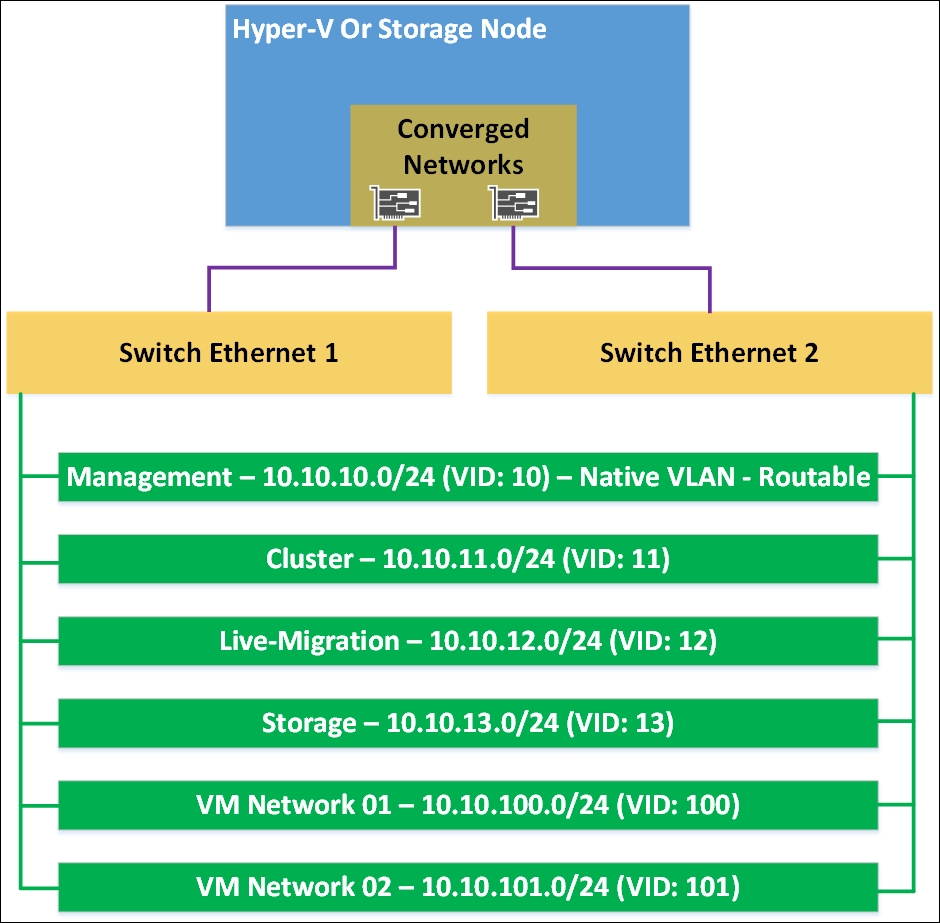
Network design for a guest cluster
Since we are already operating in a virtual world, our network setup for our guest cluster is simplified. We just need the following three types of networks instead of five:
Client network: This is used for client connections to our applications and should be configured with Role = 0
Cluster network: This serves the same purpose as that on the host cluster; configure it with the equivalent values
Storage network: This serves the same purpose as that on the host cluster; configure it with the equivalent values
These networks need to be configured on the guest cluster additionally to any host cluster networks.
The best practice in a guest-cluster environment is to change the default failover-triggering heartbeat times to allow the execution of live migrations without any cluster activities. To change this from 10 seconds (the default value and suitable for physical clusters) to 25 seconds (TCP time-outs for live migrations are typically up to 20 seconds), execute the following PowerShell cmdlet:
(Get-Cluster).CrossSubnetThreshold = 25
(Get-Cluster).SameSubnetThreshold = 25
Storage design for a guest cluster
While our network setup benefits from the virtual world, the storage design is more complicated through an added layer of complexity. Just like our host cluster, the guest cluster needs shared storage between the two virtual machines, leaving us with the following storage options:
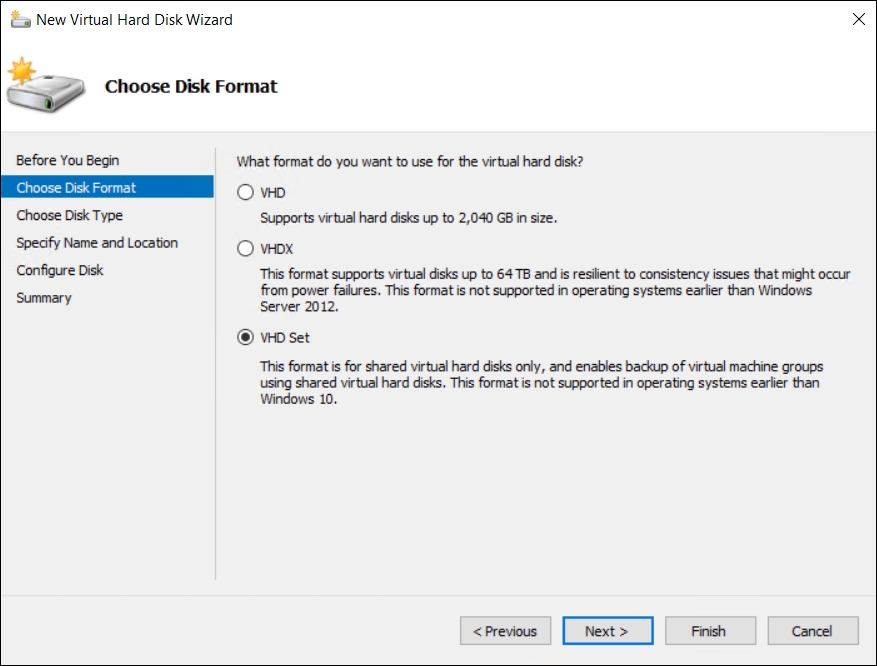
Shared VHDX: This new feature of Windows Server 2012 R2 allows multiple VMs to connect to a single virtual hard disk if it's prepared accordingly.
VHD Set: This is a new virtual hard disk format of Windows Server 2016 and it is not supported for operating systems earlier than Windows Server 2016. This format is for shared virtual hard disks only. The file format is VHDS.
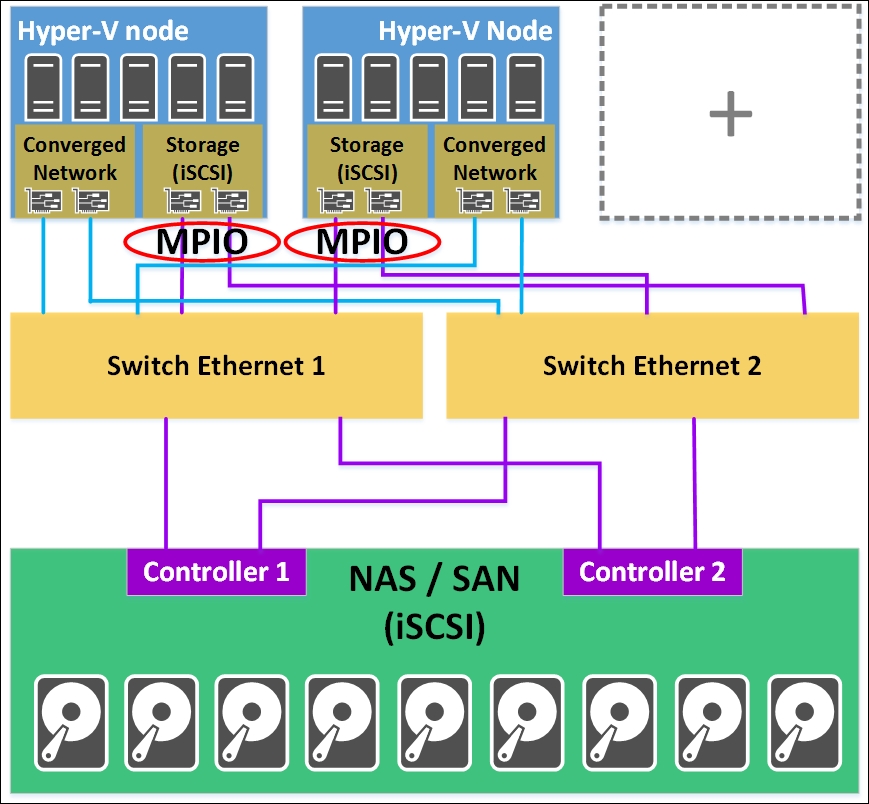
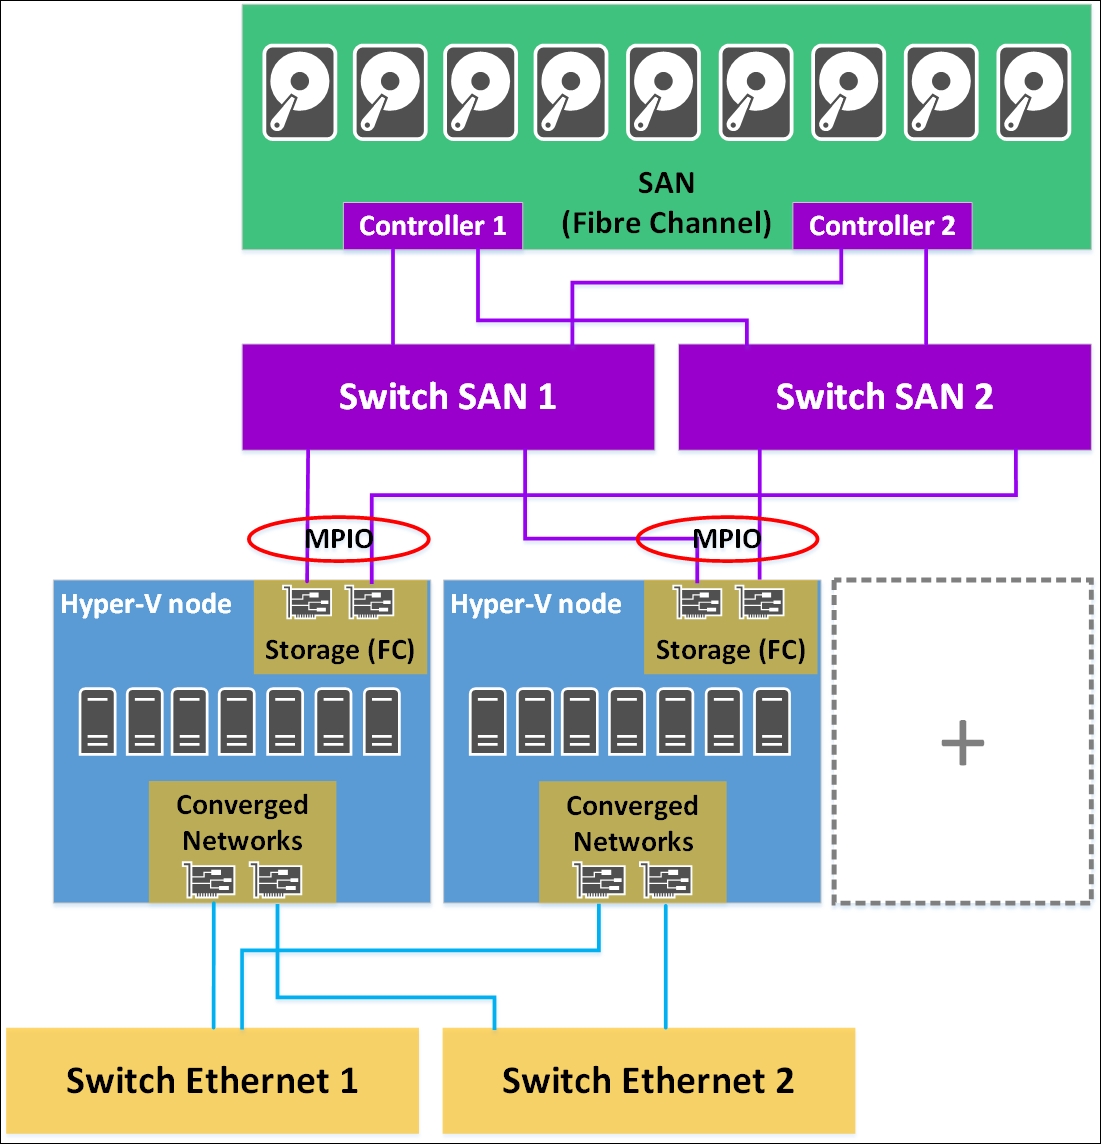
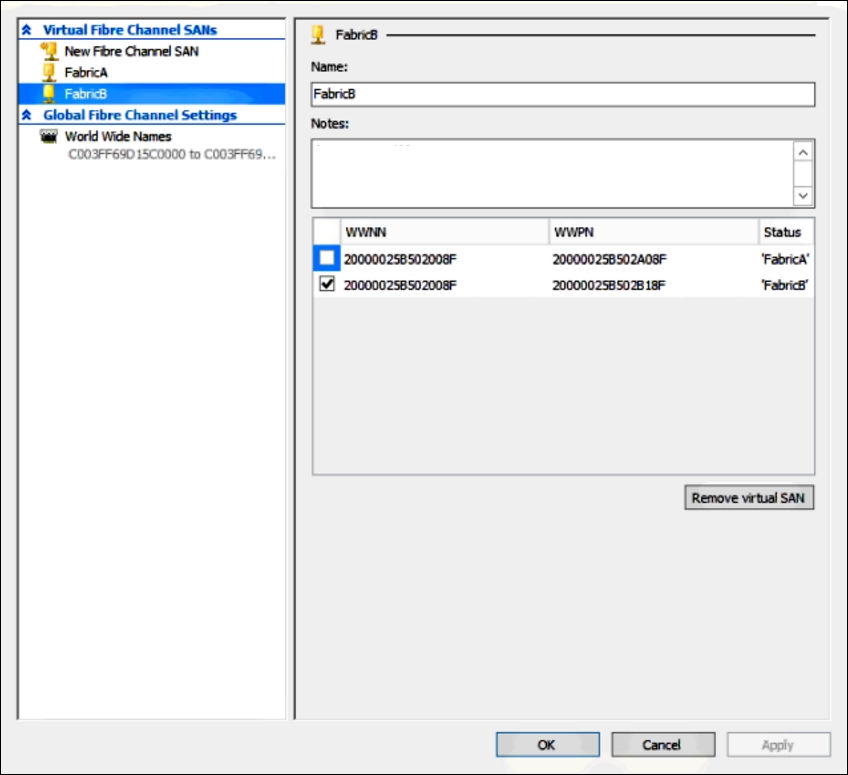
Virtual Fibre Channel: This new feature of Windows Server 2012 allows us to pass through a Fibre Channel SAN LUN to virtual machines if you are using FC storage.
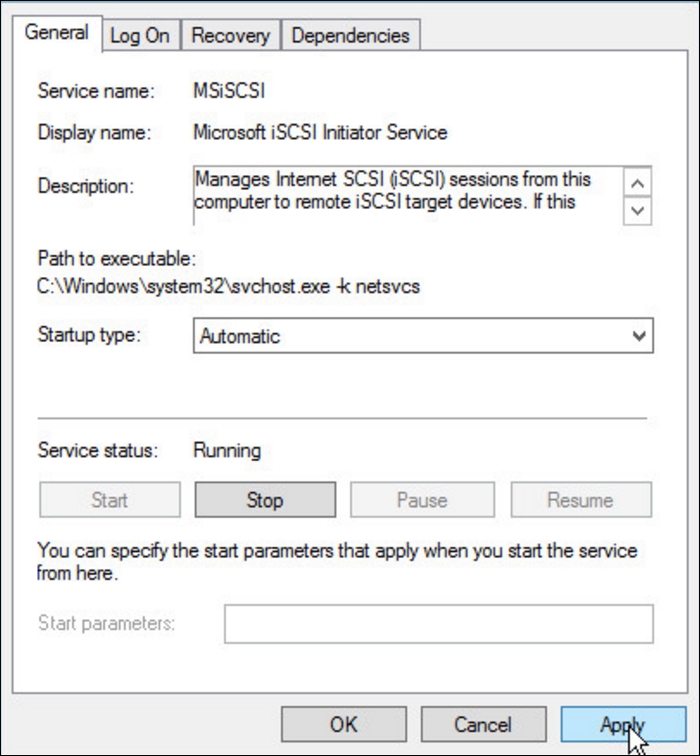
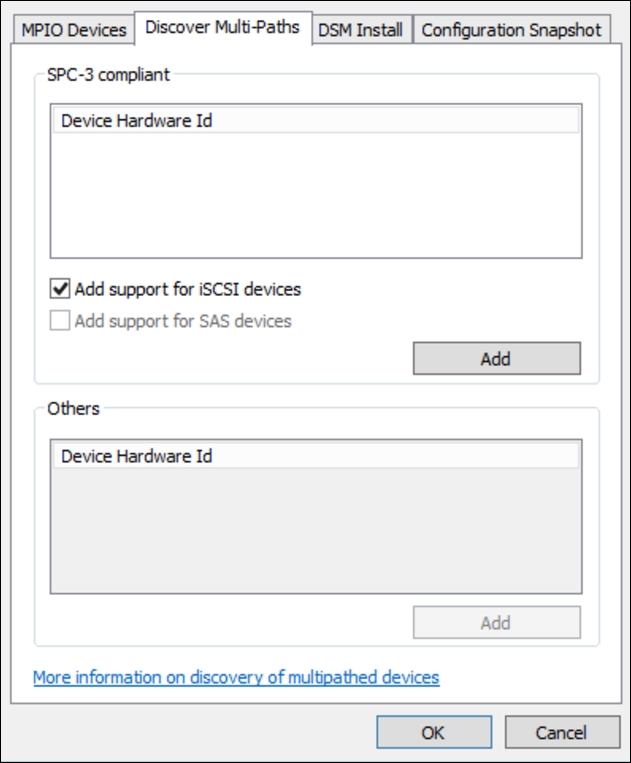
iSCSI: Connect to a iSCSI target with the iSCSI Initiator from within the VM if you are using iSCSI storage.
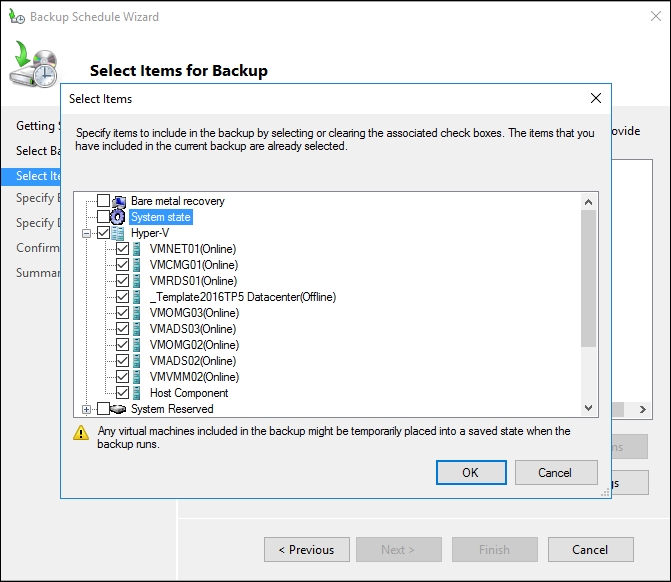
The last two storage options are explained further in Chapter 4, Storage Best Practices. We will use a VHD Set file to create our Failover Cluster:
Create two virtual machines with the Failover Clustering feature enabled and place them on your cluster shared volumes.
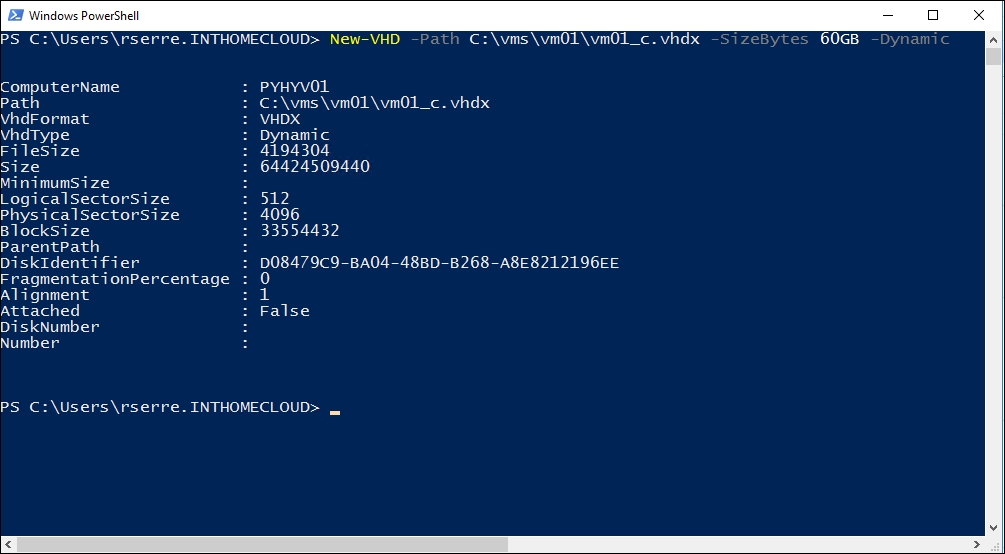
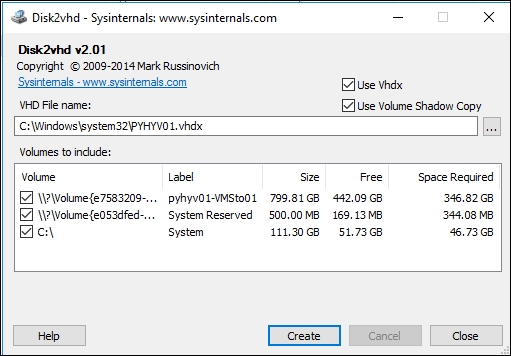
Create two new VHDS, one as the quorum and the other for data:
Creating VHD Set
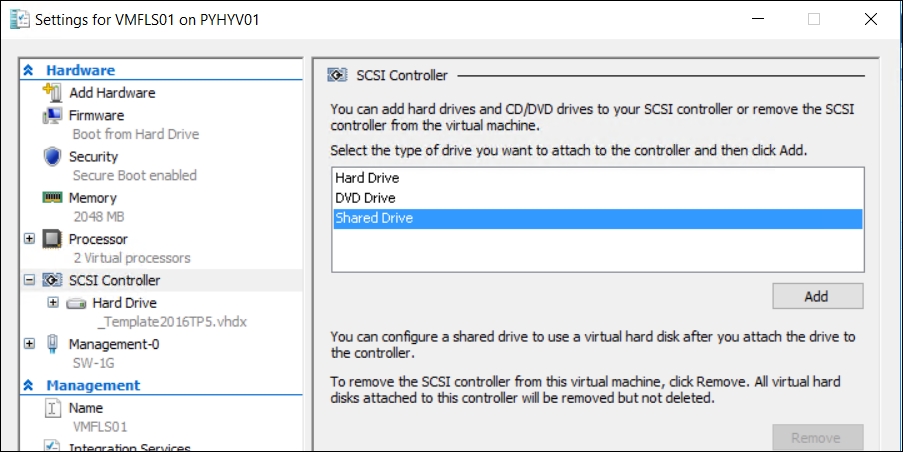
Once the VHD Set is created, you can add a new shared drive bound to the SCSI Controller. It is necessary to repeat this task for each VM that shares the VHD Set.
Create the guest cluster using the VHDS files as central storage. Install your application to host all data on the shared storage.
You should choose a VHDS when using SMB3 storage since you are not connecting any LUNs to your Hyper-V clusters directly.
Adding a shared drive to VM