
Contents
-
1: Puppet Language and Style
-
Chapter 1: Puppet Language and Style
-
Introduction
-
Adding a resource to a node
-
Using Facter to describe a node
-
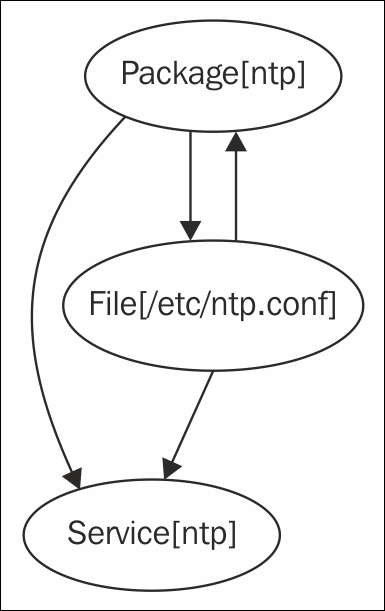
Installing a package before starting a service
-
Installing, configuring, and starting a service
-
Using community Puppet style
-
Creating a manifest
-
Checking your manifests with Puppet-lint
-
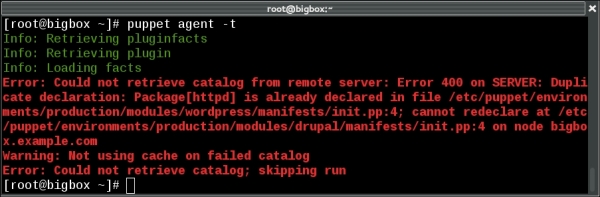
Using modules
-
Using standard naming conventions
-
Using inline templates
-
Iterating over multiple items
-
Writing powerful conditional statements
-
Using regular expressions in if statements
-
Using selectors and case statements
-
Using the in operator
-
Using regular expression substitutions
-
Using the future parser
-
-
2: Puppet Infrastructure
-
Chapter 2: Puppet Infrastructure
-
Introduction
-
Installing Puppet
-
Managing your manifests with Git
-
Creating a decentralized Puppet architecture
-
Writing a papply script
-
Running Puppet from cron
-
Bootstrapping Puppet with bash
-
Creating a centralized Puppet infrastructure
-
Creating certificates with multiple DNS names
-
Running Puppet from passenger
-
Setting up the environment
-
Configuring PuppetDB
-
Configuring Hiera
-
Setting node-specific data with Hiera
-
Storing secret data with hiera-gpg
-
Using MessagePack serialization
-
Automatic syntax checking with Git hooks
-
Pushing code around with Git
-
Managing Environments with Git
-
-
3: Writing Better Manifests
-
Chapter 3: Writing Better Manifests
-
Introduction
-
Using arrays of resources
-
Using resource defaults
-
Using defined types
-
Using tags
-
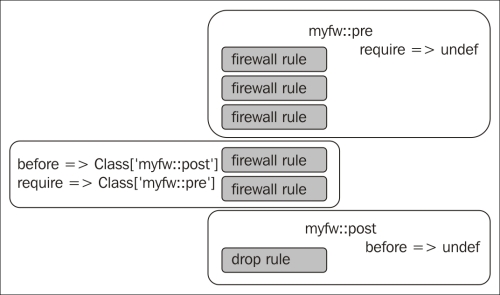
Using run stages
-
Using roles and profiles
-
Passing parameters to classes
-
Passing parameters from Hiera
-
Writing reusable, cross-platform manifests
-
Getting information about the environment
-
Importing dynamic information
-
Passing arguments to shell commands
-
-
4: Working with Files and Packages
-
Chapter 4: Working with Files and Packages
-
Introduction
-
Making quick edits to config files
-
Editing INI style files with puppetlabs-inifile
-
Using Augeas to reliably edit config files
-
Building config files using snippets
-
Using ERB templates
-
Using array iteration in templates
-
Using EPP templates
-
Using GnuPG to encrypt secrets
-
Installing packages from a third-party repository
-
Comparing package versions
-
-
5: Users and Virtual Resources
-
6: Managing Resources and Files
-
Chapter 6: Managing Resources and Files
-
Introduction
-
Distributing cron jobs efficiently
-
Scheduling when resources are applied
-
Using host resources
-
Using exported host resources
-
Using multiple file sources
-
Distributing and merging directory trees
-
Cleaning up old files
-
Auditing resources
-
Temporarily disabling resources
-
-
7: Managing Applications
-
8: Internode Coordination
-
9: External Tools and the Puppet Ecosystem
-
Chapter 9: External Tools and the Puppet Ecosystem
-
Introduction
-
Creating custom facts
-
Adding external facts
-
Setting facts as environment variables
-
Generating manifests with the Puppet resource command
-
Generating manifests with other tools
-
Using an external node classifier
-
Creating your own resource types
-
Creating your own providers
-
Creating custom functions
-
Testing your puppet manifests with rspec-puppet
-
Using librarian-puppet
-
Using r10k
-
-
10: Monitoring, Reporting, and Troubleshooting
-
Appendix A: Index