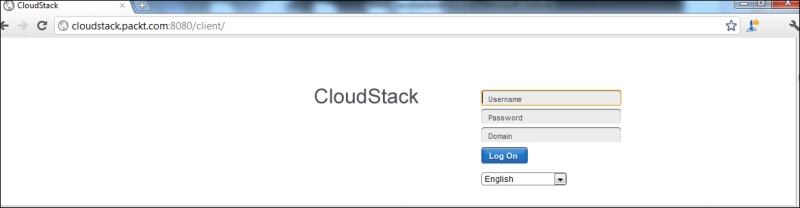
The output tells us the IP address that is used to bind the management server, in case you have multiple network interfaces. You can open the user interface in a web browser using the following URL:
The user interface can be accessible using the IP address of the management server or the FQDN, If you are using the FQDN of the management server, the domain name should be resolvable from the host that you are accessing. It can be done using a pointer record in the DNS server of the network or through an entry in the host file.
You will need to use the management server's IP address or management server's hostname in place of the <cloudstack-management-server-ip>. For using the hostname, you must have the DNS entry in the host file of the machine from where you are trying to access the UI. One can use common browsers such as IE7+, Firefox 3.5+, and Safari 4 and Safari 5 for viewing the UI.
This interface is for both end users as well as for administrators. The end users can use this UI for viewing, using and managing their cloud resources such as virtual machines, templates, ISO, data volumes, their snapshots, networks, and IP addresses.
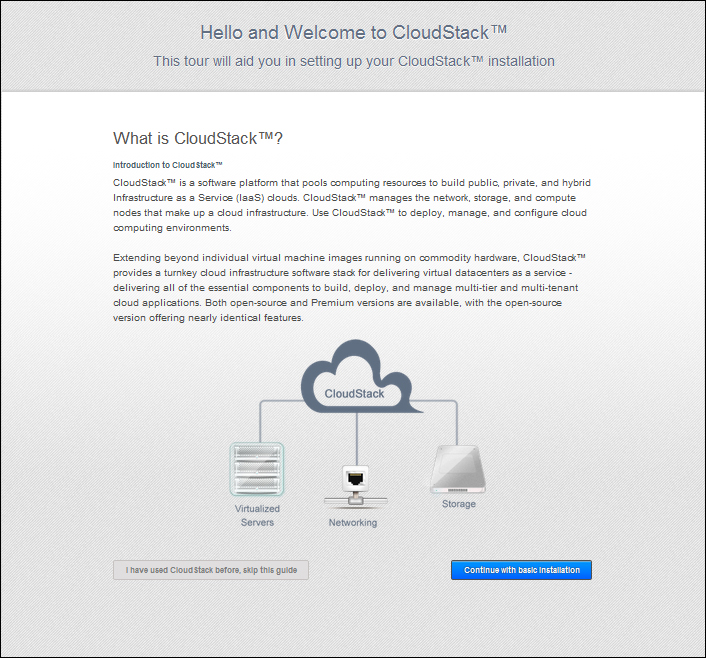
When you enter the URL as provided above to access the user interface, you will get a screen as follows. The default username and password for the CloudStack management server user interface login is Admin and password. The users log in to the User Interface using the default credentials the first time and should change the default password after that. Later on, when the domains are configured, the domain users (which is discussed later) can also log in using their credentials along with the domain name. The users in the root domain don't need to provide the domain name while logging in.
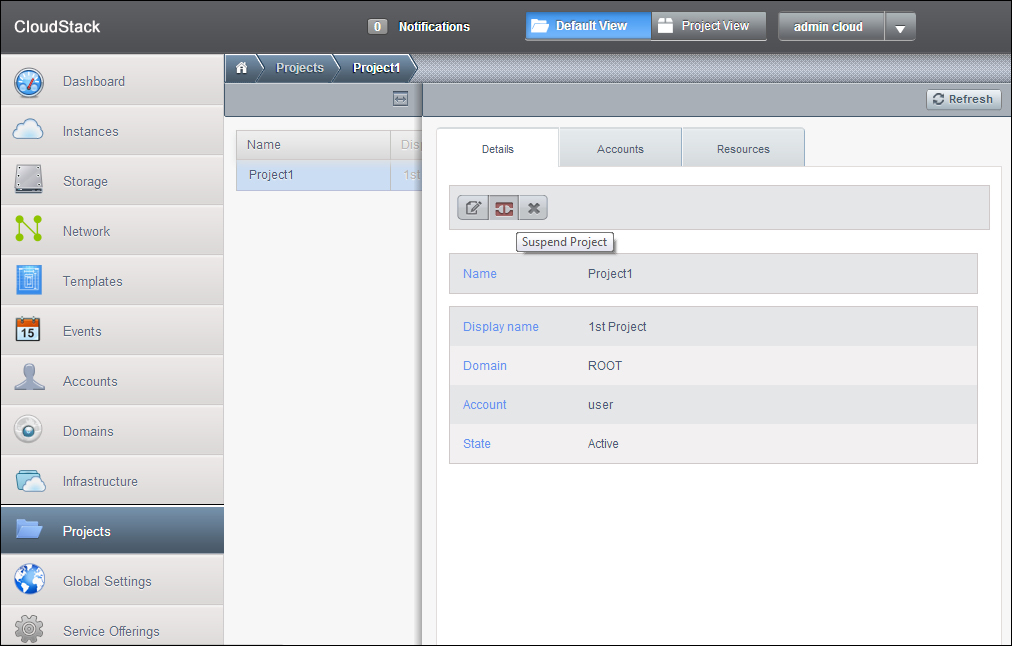
On the first root/administrator login after the installation of CloudStack, you will be given an option to take a guided tour to CloudStack to provision your cloud infrastructure. On the next login attempt you will get the dashboard instead.
We will continue with the second option on the screen and will configure the CloudStack environment so that we can manage our infrastructure. After logging in as the root user, you will get a screen as follows:
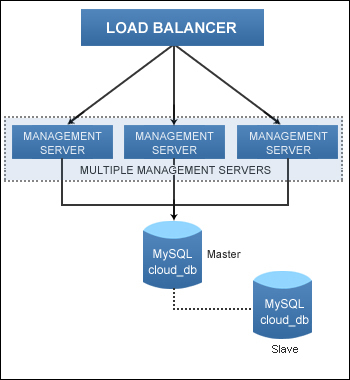
This screen is the Dashboard of the CloudStack Management Server which shows the status of all the Management servers if you have chosen a multinode installation.
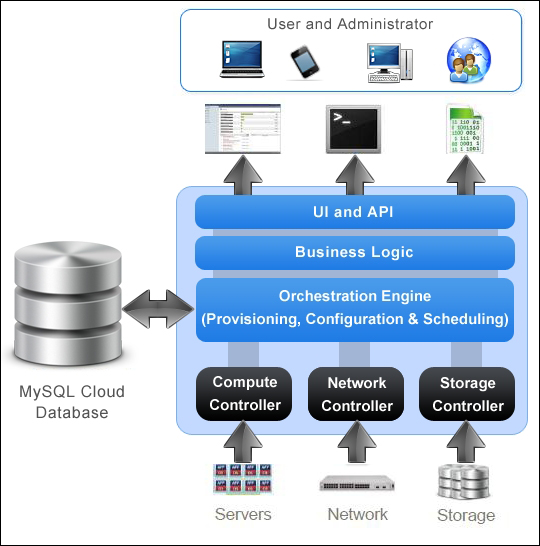
Management server console
The management server console is used by the administrator to configure the cloud and to create various types of offerings as per the design and deployment plan. It is used by the users to request resources from the cloud by selecting from the offerings designed by the administrators. Some of the panel options that are available in the UI are discussed in the following sections.
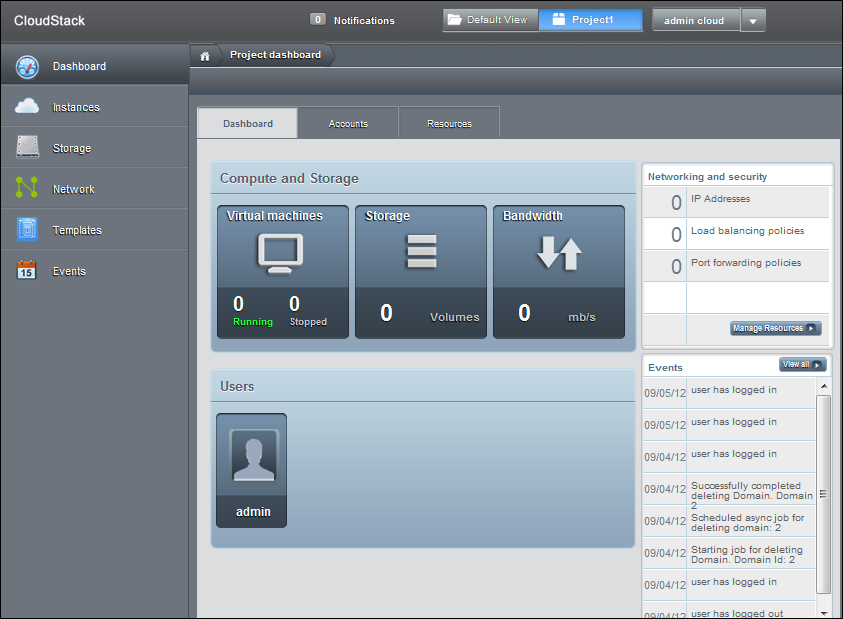
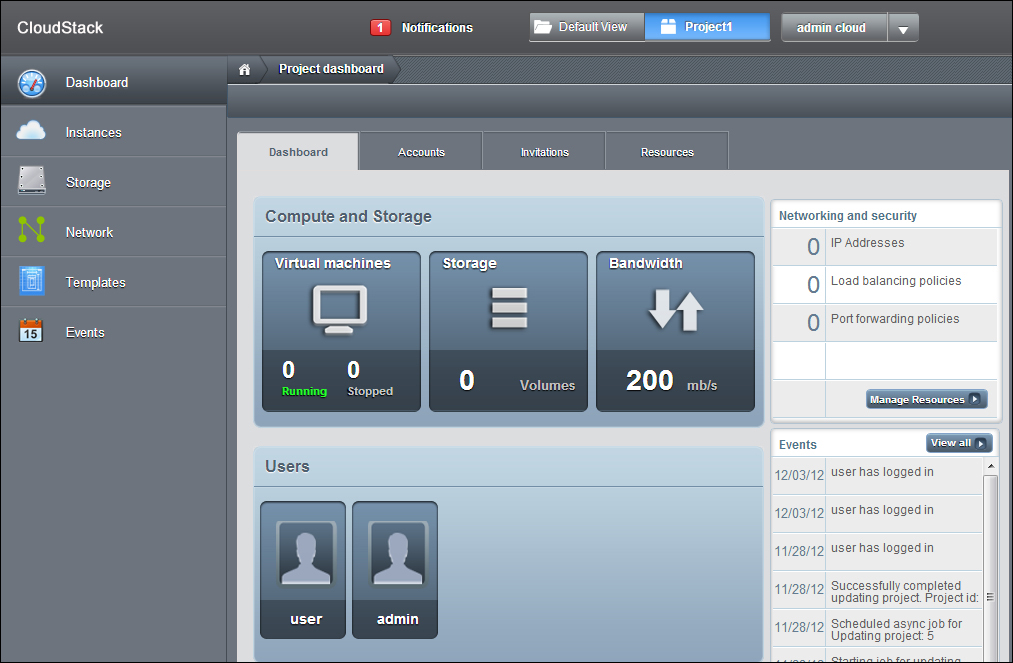
The dashboard is the page where you get a brief overview of the health of various services registered in CloudStack as well notifications for various events triggered by the CloudStack system. In the default view, one can see the alerts that are triggered, where as in a project specific view, the dashboard shows the virtual machines, volumes, users, events, network settings, and so on that are specific to a project. The project dashboard screen looks as follows:
From the dashboard, the user can perform a number of functions by navigating to the page directly.
There are total of 3 tabs available which guide to other operations, they are:
Dashboard: The dashboard screen highlights the number of VMs, storage volumes, bandwidth, and users that are configured with CloudStack.
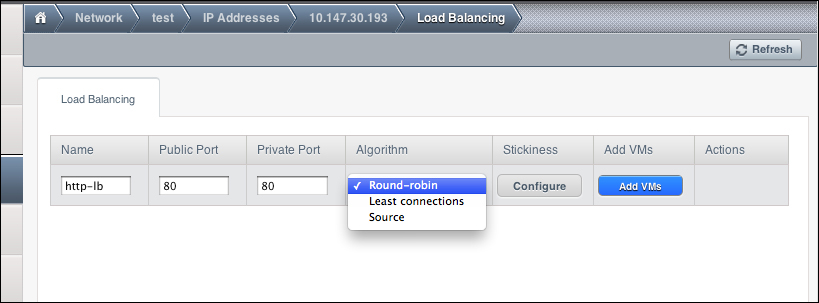
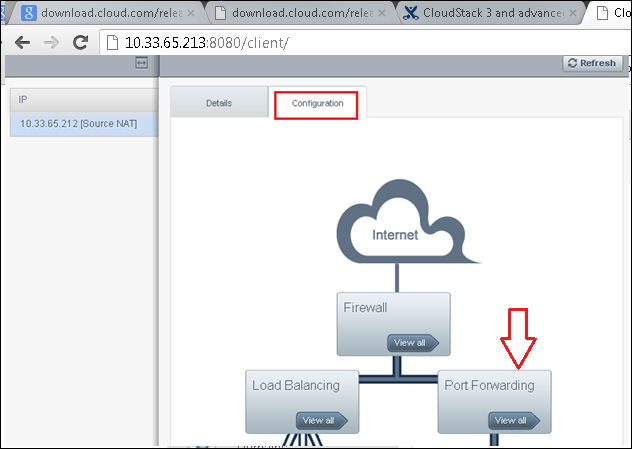
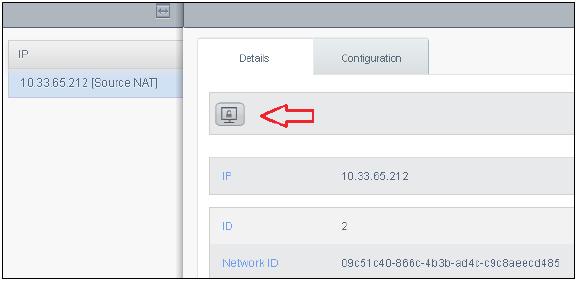
The administrator can also manage network resources by using the link given on the right-hand side. On clicking the Manage Resources link on the right side menu, the admin can add new guest network to the CloudStack project, can acquire new IP addresses, and can set up load balancing and port forwarding rules. The administrator can also use the Network tab on the left to manage the network.
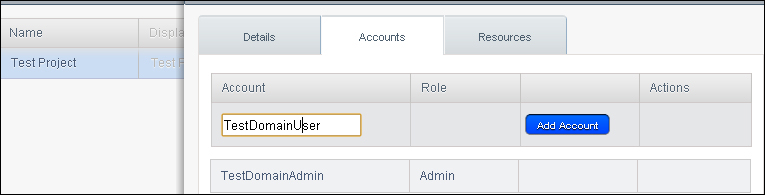
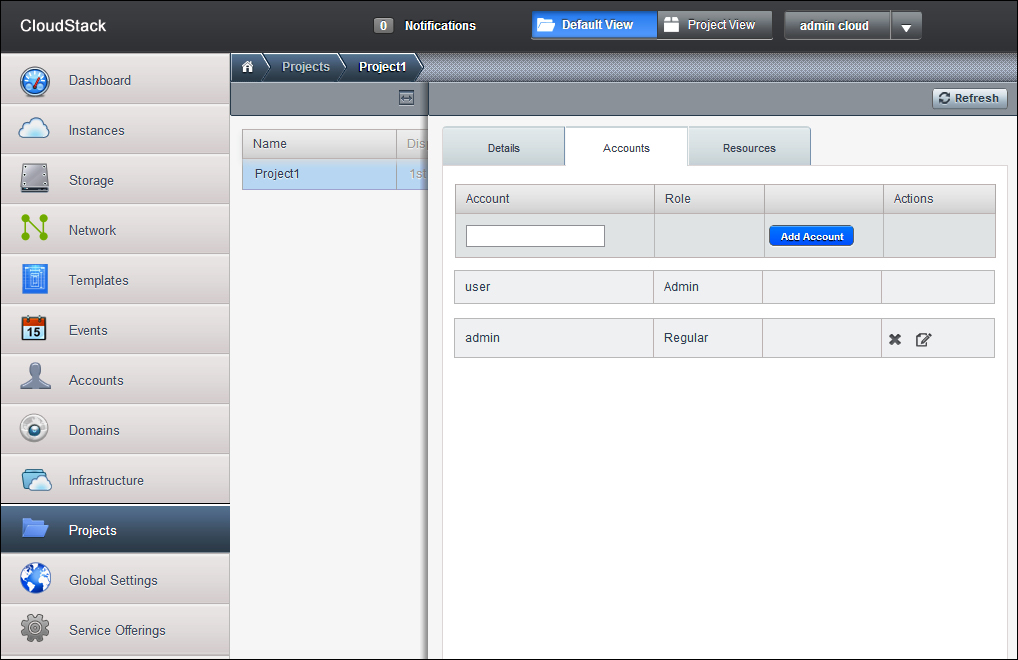
Accounts: The administrator can view and manage members of the project selected. The administrator can also add new members to the project, remove the existing members as well as change the role of a user. There are two roles available by default: user and admin. There can only be one admin user at a time in a project and a user can belong to only one project and one account.
Resources: On the resources tab, the user can view the limits to various resources on the project. The project administrator can also lower the resources also.
Invitation: This tab can also appear if invitations are enabled in the global configuration settings (discussed later). Using the Invitations tab, the users can view and manage the invitations which have been sent to new members of the project selected.
CloudStack can be configured in such a way that the users are directly added to it or it can be a necessity for a user to accept the invitation to join cloud. The members to whom the invitations are sent can either accept their invitations or reject them. The pending invitations will be listed here until the timeout specified. The user can also cancel the invitations. Once the invitation is accepted, the user is added to that project.
The invitations can be enabled in CloudStack by setting the parameter project.invite.required to true in the global settings page. There are various other parameters that are used to customize the request.
The
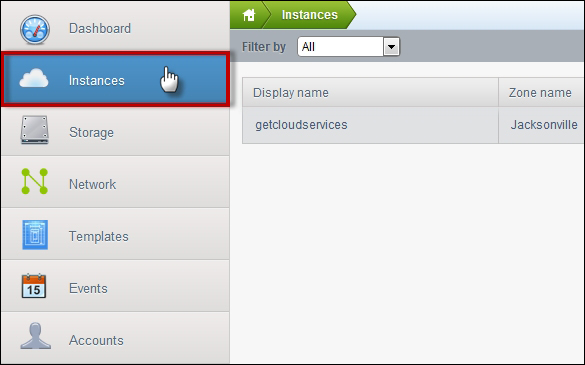
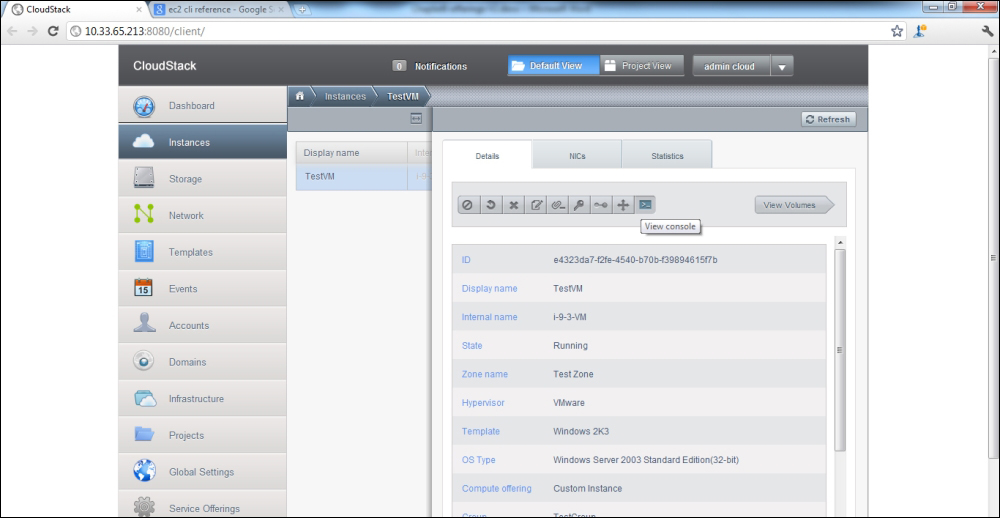
Instance tab of the left panel will display the instances that are provisioned using CloudStack. In the default view, all the instances in the CloudStack environment will be displayed, and in the project view, various virtual machines that are provisioned under the selected project will be displayed. The various details of the instances are displayed for all the instances.
The
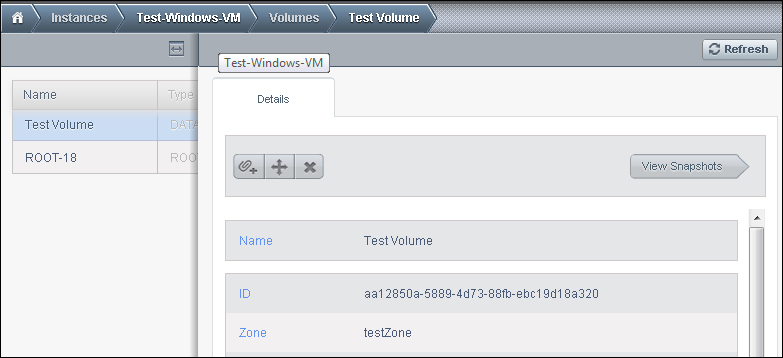
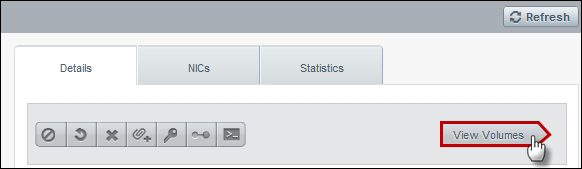
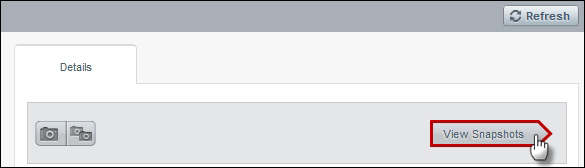
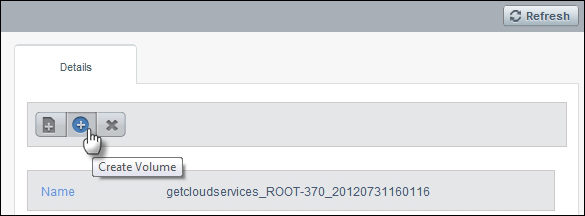
Storage tab allows the administrators to create, view, and manage volumes and snapshots. These volumes are provided by the storage configured in CloudStack set up. The various details of volumes are also provided on the page. In the project view the volumes available in the project selected are displayed as well the users who can create, view, and manage storage volumes and snapshots.
The
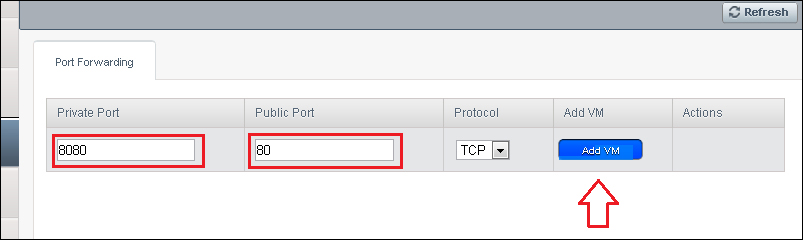
Network tab provides us options to view, add, and manage the guest networks present in CloudStack. The users can acquire IP addresses, set up the load balancers, and create port forwarding rules.
The
Templates page displays the various existing templates. The user can also create new templates by providing the description, selecting from the list of hypervisors, or selecting the OS type, and so on.
The templates can be created by the CloudStack administrator as well as any of the cloud users. The templates are the OS images using which the guest instances are created. These templates contain the configuration information about the OS type, software packages, and so on and they are associated with particular hypervisor. While creating an instance, the user specifies the template, based on which the instance is created.
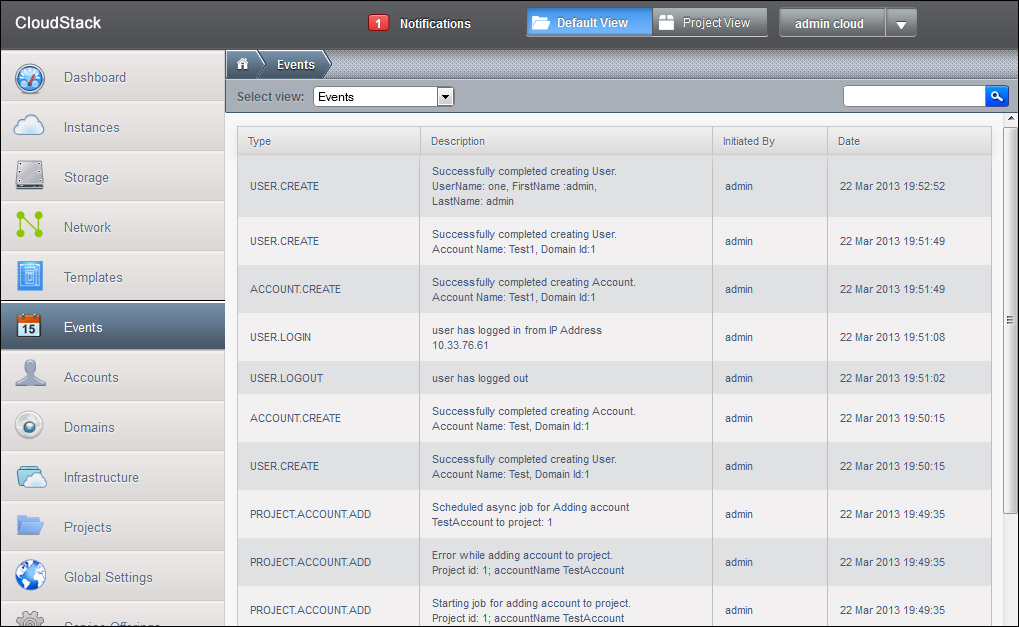
The Events page shows the various events in the CloudStack deployment. It basically acts as the logging place where one can see the log of activities performed in CloudStack. The following screenshot displays a typical event page displaying all the events.
The
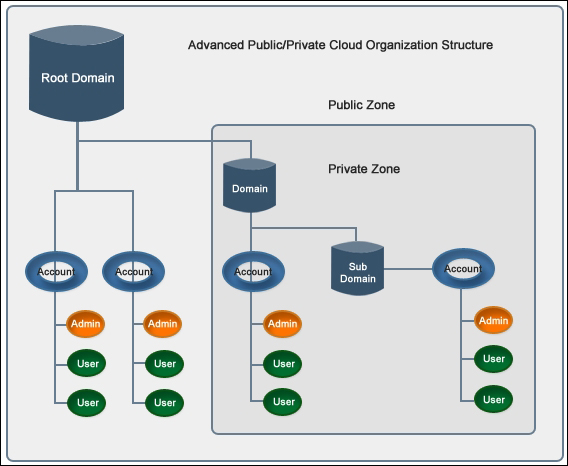
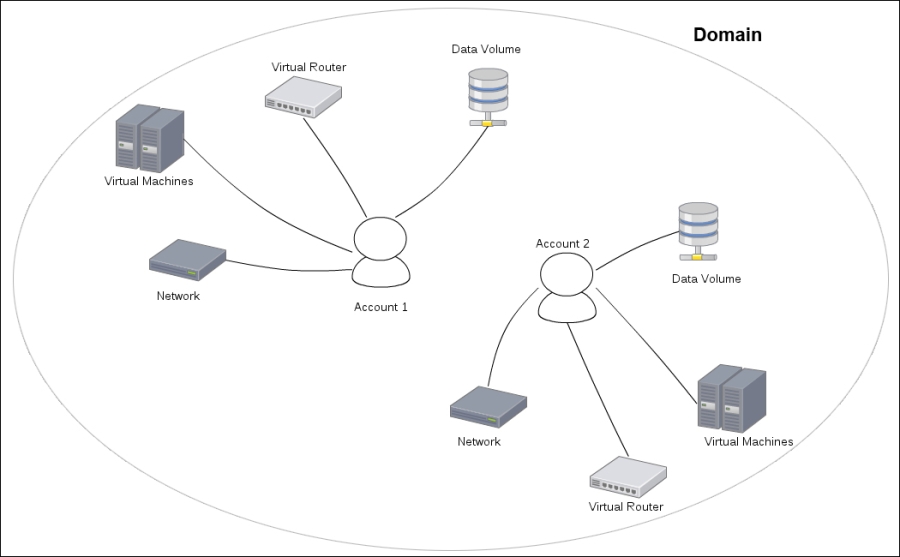
Accounts tab enables the admin to create, view, and manage accounts in various domains. Accounts created in cloud basically represents customer of the service provider or it can also be used to distinguish departments in a large organization. There can be many users in a single account. The resources in the cloud can be shared between users of the same account whereas the users in different accounts are isolated from each other. An account can have any of the two roles—user or admin.
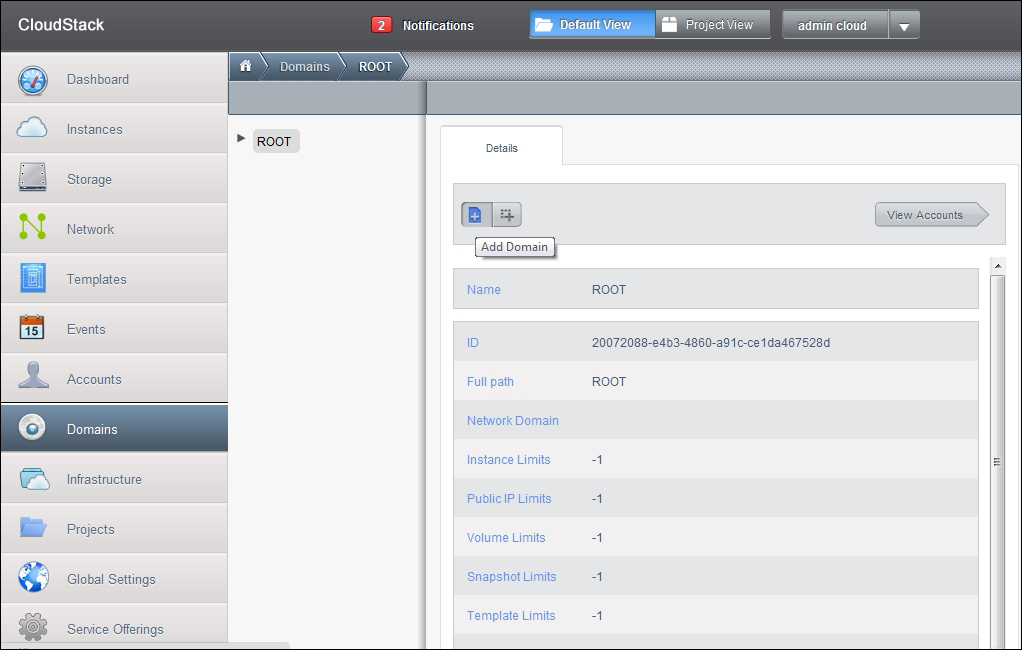
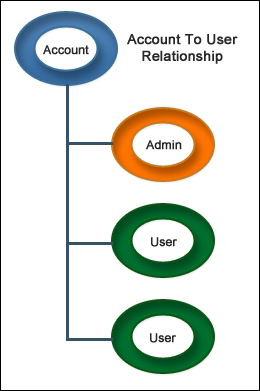
Domains are basically referred to a group of accounts—a domain can contain multiple accounts. The domain is used to group some accounts that are related to each other. A domain can also contain various sub domains. Domains can be created for resellers by the service provider.
In the domains page, the user can create, view, and manage domains in the CloudStack environment. The administrator can view various accounts in a domain. The administrator can update the domain and also view the details of an existing domain; for example, the limits on various resources such as volume, IP, and network as well as view the details of number of volumes and networks.
The
Infrastructure tab provides details about the CloudStack infrastructure such as number of zones, pods, clusters, and hosts, number of pods, number of clusters, and the number of hosts. The user can navigate to the any of the infrastructure component to create, view, and manage them such as the user can navigate to the zones and view all the existing zones, add new zone by providing various required details.
The
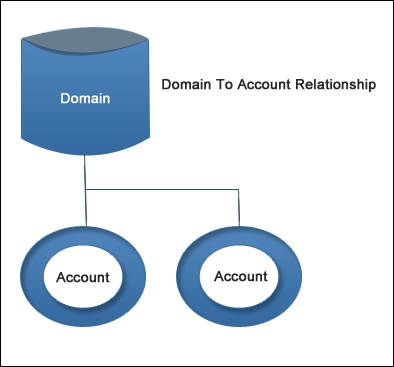
Projects tab displays the projects details. The administrator can view all the projects that exist in the CloudStack environment and a user can view the project details of their projects. The creation of projects allows administrators to create groups for dividing their workforce; these groups share resources in the CloudStack environment. An organization can create various projects with different groups of people to share the resources in the CloudStack environment. The project administrators have the privileges to set limits on the amount of resources such as VM instances, snapshots, templates, and volumes. The resources created by a user in a project belong to that project and cannot be used outside that project. The user can also create resources outside a project, but this resource belongs to the user's account and is not a part of any project. A single user may belong to multiple projects and will have access to resources based on the projects assigned to them.
The administrators can also create a project specific network to isolate the project related traffic in the CloudStack environment and can also provide project specific network services such as port forwarding and NAT. CloudStack also provides shared resources which can be shared across projects as well as used by individual users. The options for making resources dedicated to a project or keeping them shared are a part of adding resources.
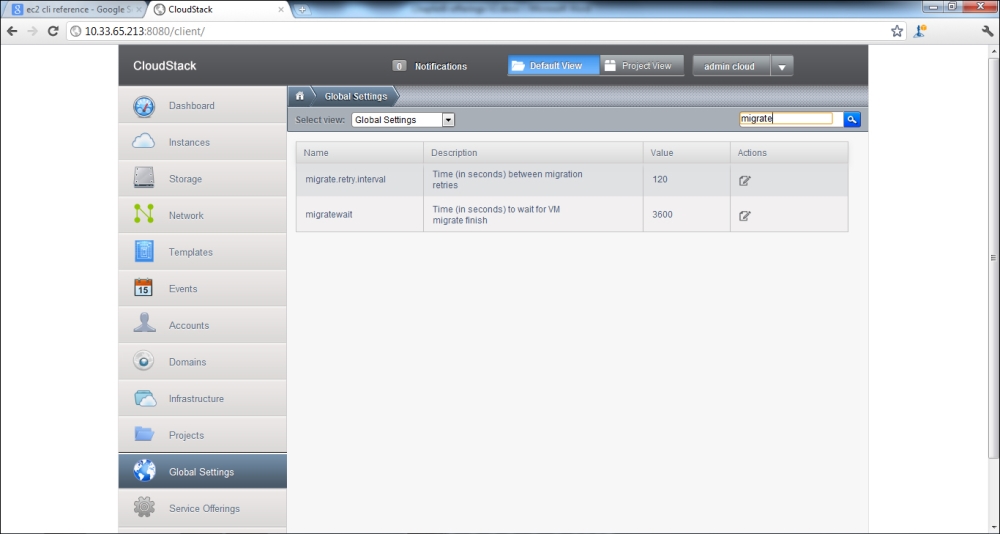
The global settings page provides the settings for various parameters in the cloud. These parameters control many aspects of cloud. The CloudStack administrator is recommended to check the global settings of parameters. The global settings page mainly has two options, which are:
Global settings: The configuration of various parameters. This lists the various parameters that define the settings and configuration in cloud.
Hypervisor capabilities: This displays various hypervisors with their respective versions that are supported by CloudStack. The administrator can click on the hypervisor to edit as well as view that hypervisor capability; for example, the administrator may choose to increase the maximum guest VM limit on that hypervisor.
Now that we have completed the introduction to the user interface and the various options available, we will begin with the process of setting up the infrastructure and users to the cloud. Before that, let's go through some of the keywords which will be used very frequently in the chapter.
There can be various types of administrators:
Cloud administrator: There can be cloud administrators who have complete access to the system who can manage templates, service offerings, projects, users, accounts, domains, create, and delete other administrators.
Project administrator: The project administrators have access to the resources in the project only, they can add, view, delete, and modify the existing users, accounts, which belong to the project. They don't have the privileges to access the physical resources or any other projects.
Domain administrator: The domain administrators have access to the resources in that domain only and cannot perform actions on resources other than their domain.
You can also integrate an existing external LDAP with CloudStack like Microsoft Active Directory services or ApacheDS. The integration of CloudStack can be done with LDAP or ADFS using API provided by CloudStack. CloudStack searches external LDAP directory tree structure for matching common values for users such as their e-mail address and name. We specify the base directory in our LDAP directory tree and CloudStack will start the search from that directory and return the name of Distinguished Name (DN) of the matching user. The user can use this DN along with their password to log in to the CloudStack. The integration of CloudStack with external LDAP services can be done using the CloudStack API.
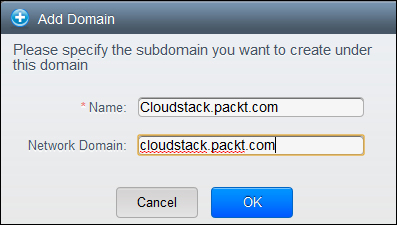
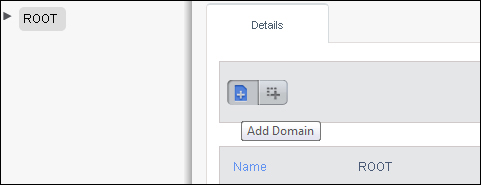
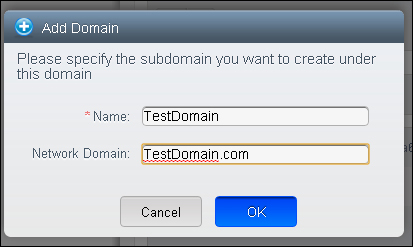
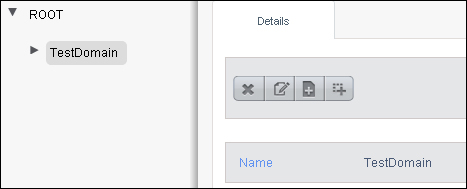
Now, as we have explained that there can be various administrators in CloudStack, let's have a look into what are these domains, accounts, and projects. We will go through a step-by-step process of creating users, accounts, domains, and projects. When you first install CloudStack, a domain name Root is already created for you. You can create new domains by going to the Domain tab and clicking on Add Domain as shown in the following screenshot:
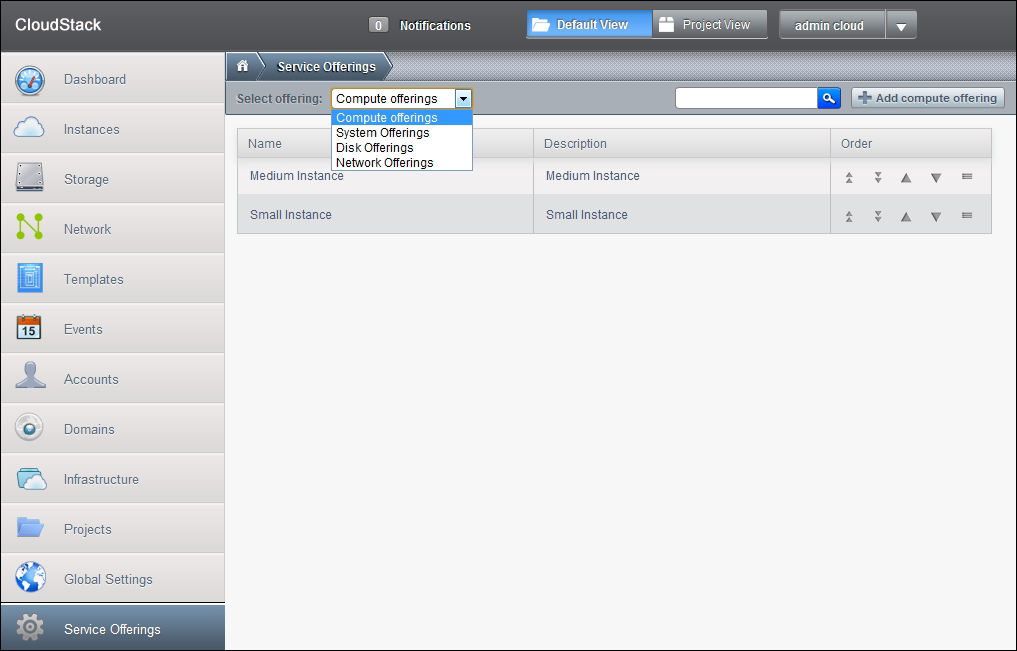
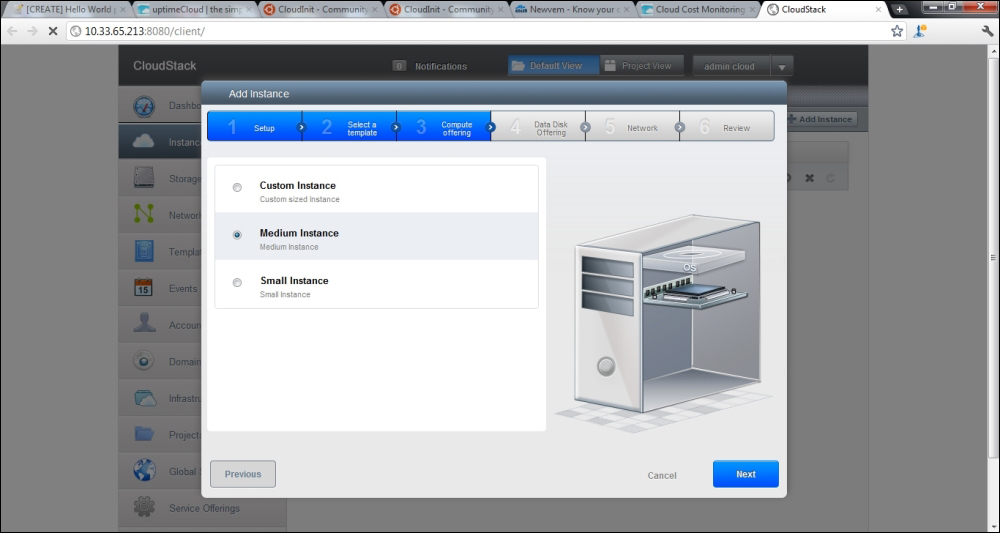
Let's move on to adding offerings in the cloud which we will be providing to the users. The users as well as the admin can go to the Management server console and request any one of the offerings from the list which we will be adding and configuring in the cloud as a cloud administrator. There are various types of offerings that can be created from the cloud console, they are described below.
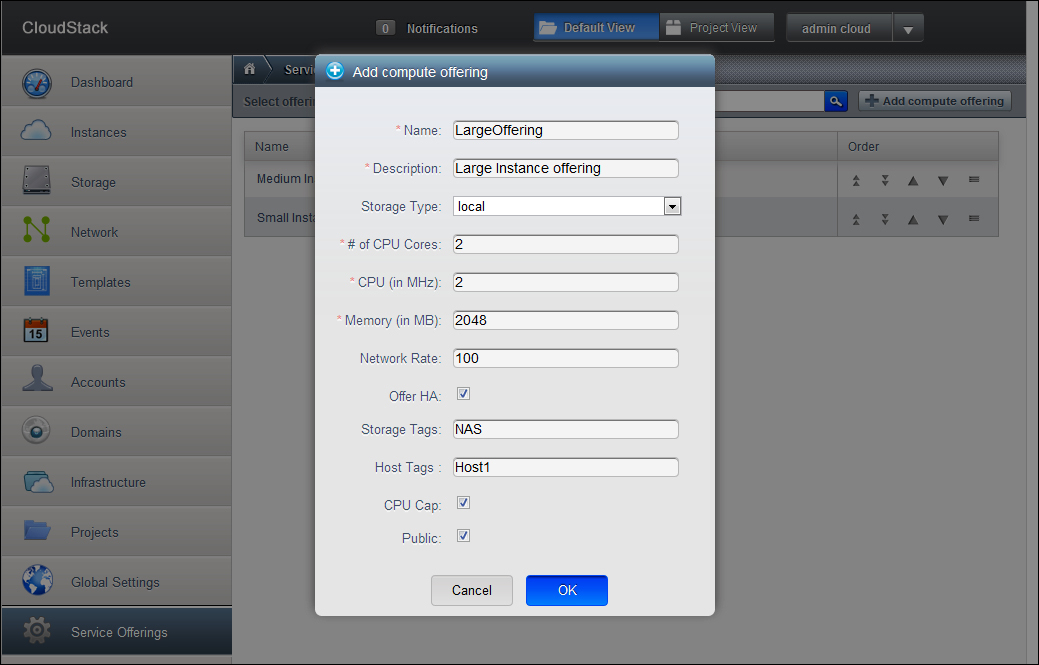
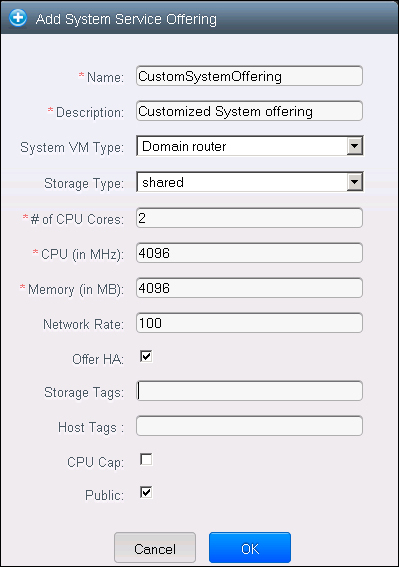
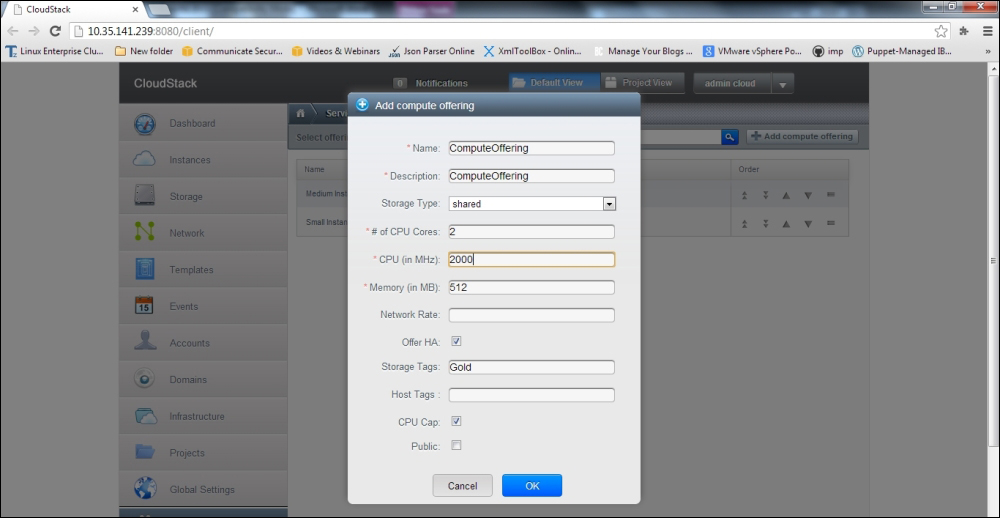
These offerings are basically details about the compute offerings such as the choice of CPU speed, number of vCPUs, RAM size, root device tags, storage type and storage tags, network rate, and other compute choices. To add a new compute offering, we need to move to the Service offerings tab and select compute offering from the drop-down menu at the top, as given in the following screenshot:
To add a new compute offering, click on the Add Compute Offering tab, and provide the appropriate entries as shown in the following screenshot:
The various fields in the screen are described below:
Name: This will be the name of the Compute offering we are going to create.
Description: Description of the compute offering we are creating.
Storage type: This field describes the type of storage that will be provided in this offering. It can be local storage or shared storage. Local storage is the storage from the host on which the hypervisor is connected and the shared storage is the storage that is accessible by NFS, network attached storage.
# of CPU cores: The number of CPU cores that will be available in with this offering.
CPU (in MHz): This is the speed of the CPU clock which will be offered to the instance in this offering.
Memory: The amount of memory available with this offering in MB.
Network rate: The network data transfer rate in this offering in MBPS.
Offer HA: This is an option provided to the user, whether he wants to monitor the instance and make it as highly available as possible.
Storage tags: These are the storage tags that should be associated with the primary storage for providing disk storage to the instances.
CPU cap: This option is to limit the amount of CPU available to the user to the assigned value, even if there is spare capacity available.
Public: This option is provided for the visibility of the service offering. Public means that this offering will be available to all the domains in the cloud. If you don't want this offering to be public, CloudStack will let you configure the scope of the visibility of the offering. We can define the scope of the visibility of the offering to a subdomain. CloudStack will prompt to select one of the subdomains from the drop-down list.
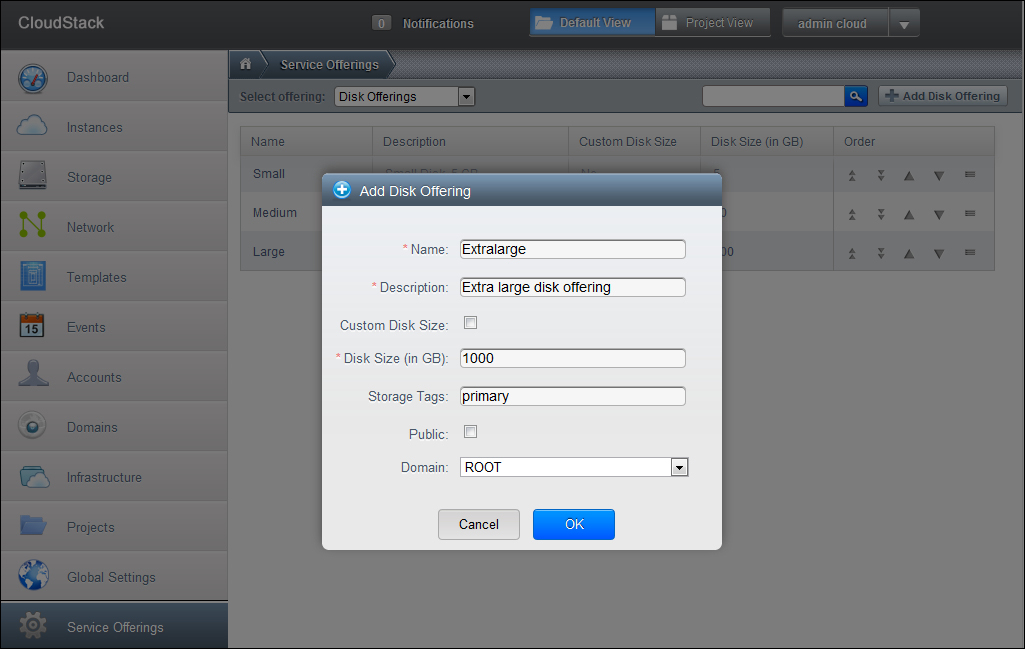
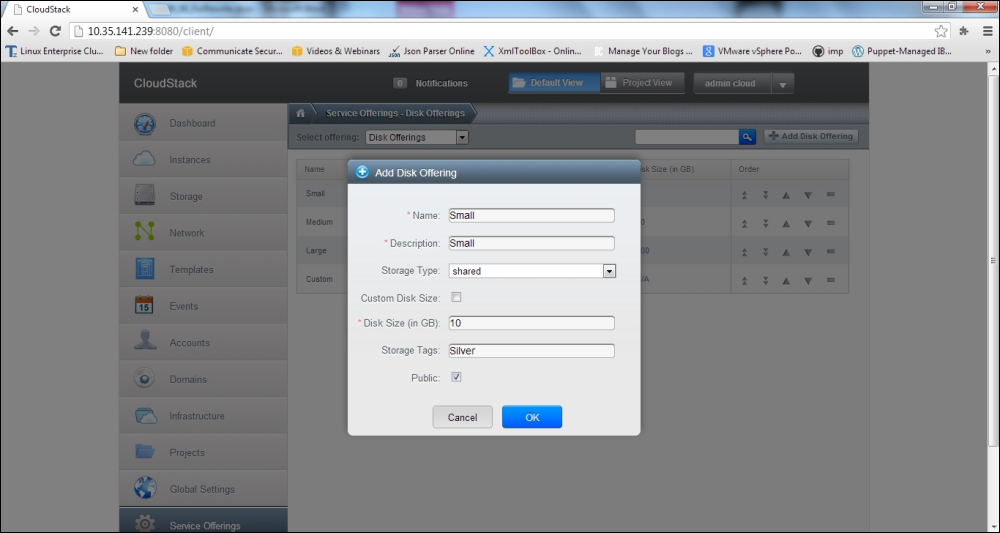
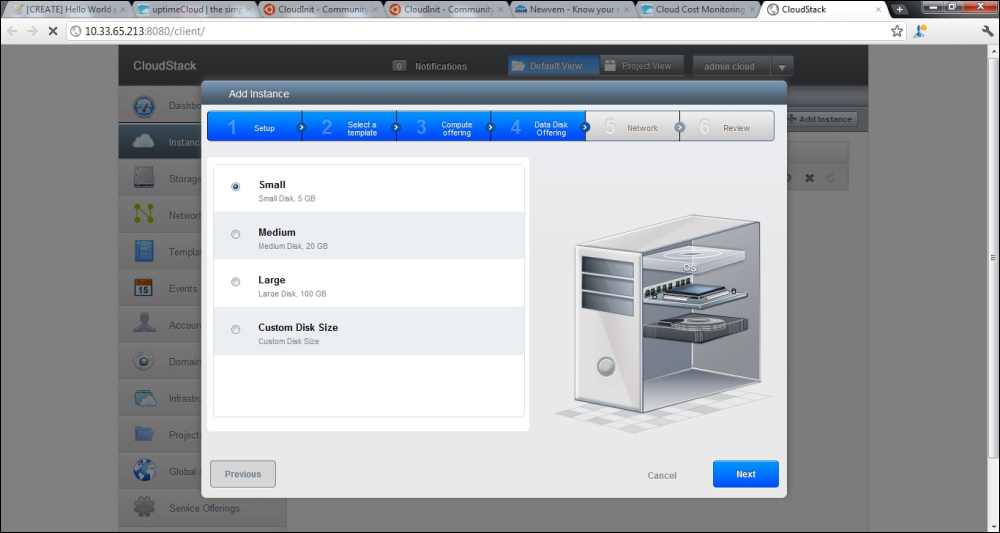
Using Disk offering, we can specify the choice of disk size that the users can request from the Primary storage. For creating a new Disk offering, you need to select Disk offerings from the drop-down menu on the Service Offering page and click on the Add Disk Offering button in the upper-right corner of the screen. You will get a screen like this:
You need to enter all the details in the form as per the offering that you want to create. The fields are described as follows:
Name and Description: The name and description of the Disk offering that you are creating. This will appear in the service request page when the user requests services.
Custom Disk Size: This option allows the user to specify the volume size that he wants for the disk. If this is not checked the administrator will provide the size of the volume and the user will get that much amount of the volume. If it is not checked, you will have to enter the size in GB for the offering.
Storage tags: This option provides the tag that is to be associated with the primary storage for this offering. CloudStack uses this tag to match with the tag of the primary storage volume. The disk is offered to the user from the primary storage whose tag matches the tag provided here. If CloudStack finds that there is no primary storage available with a tag name, the provisioning fails.
Public: This field specifies the permissions defined for the disk offering. This value determines whether the offering will be available to all the domains in the cloud or only one particular domain.
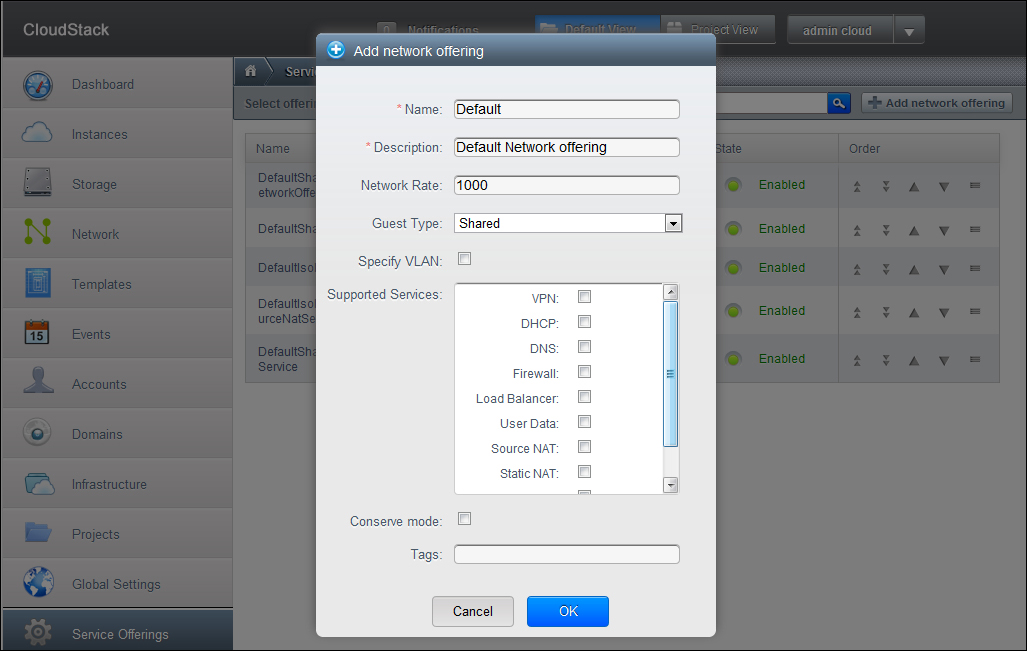
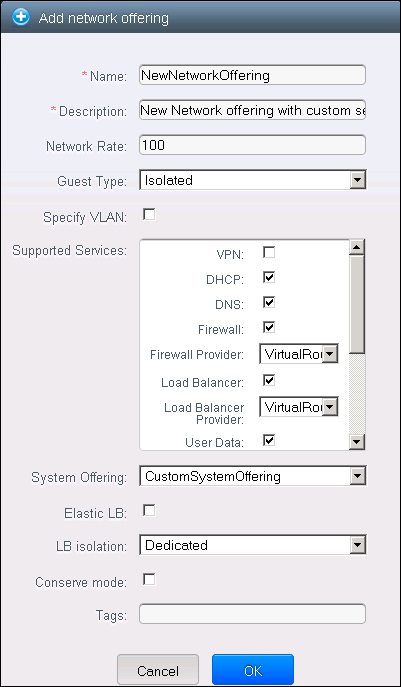
The network offerings are the set of features that will be available to the users as offerings from the virtual router or any other external network devices on the guest network he is on.
There are various network offerings that you can select from the list, they are as follows:
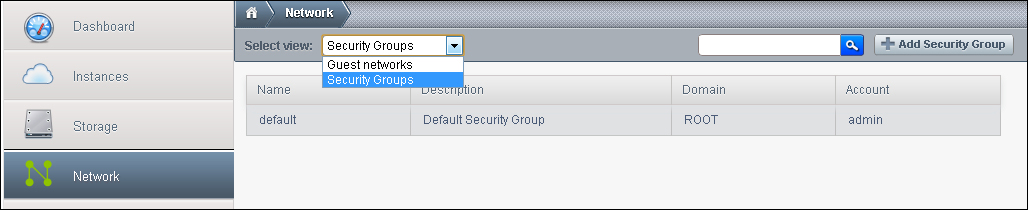
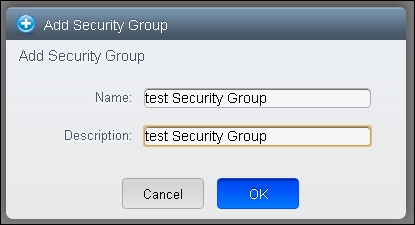
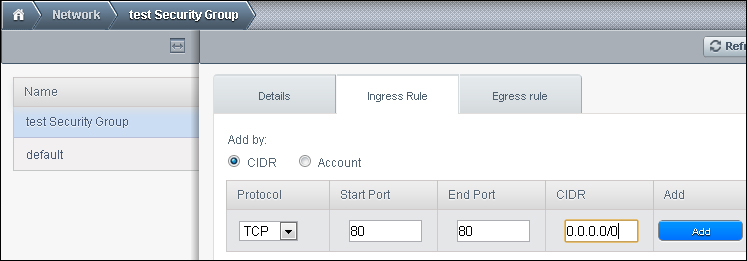
VPN, DHPC, DNS, Firewall, Load Balancer, User Data, Source NAT, Static NAT, Port Forwarding, and Security Groups.
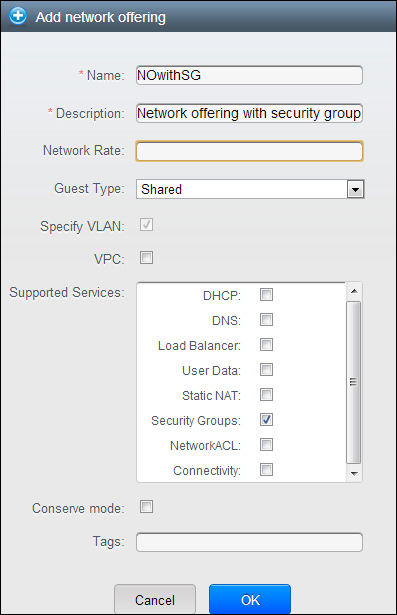
For adding a new Network Offering, you need to select the Network Offering from the drop-down list on the Service offering page and click on Add new Network Offering button on the right top. You will get a page as shown in the following screenshot, where in you will have the option to select for the network offerings.
The options that are provided while configuring the network offering are:
Name and description: The name and the description of the Network offering that we are creating.
Network Rate: This is the maximum network data transfer rate that is allowed in the offering.
Guest Type: The network offering can be Share or Isolated offering. These have different characteristics as described in Chapter 2, Installing Apache CloudStack.
Supported Services: These are the services that can be provided with this offering such as the Load Balancer, VPN, DHCP, and DNS. The options available with different services will be as per applicability of the configurations. As an example for a load balancer, you can select CloudStack Virtual router or any other load balancer which is configured in cloud.
Conserve Mode: This defines whether the conserve mode is to be switched on or off, when this mode is enabled, the network offering will be provided only when the first virtual machine is started in the network.
Tags: This tag defines the physical network to be used with this network offering.
On these pages, after the creation of various offerings, you can also edit the offerings such as disabling them, editing some properties.
Now that we have got our hold on creating different types of offerings, let's move to adding some infrastructure to the cloud. After which we will be able to create service offerings which will be provided to the end users to request.
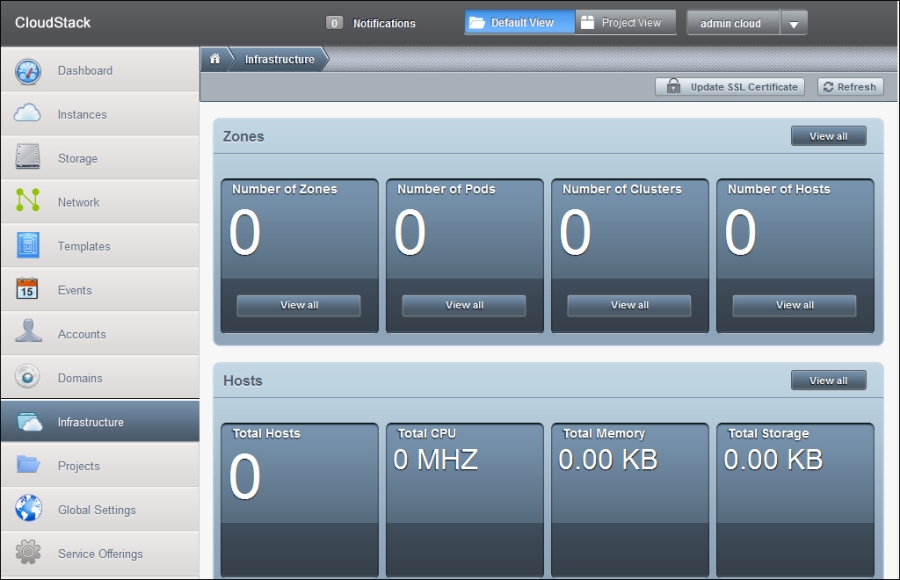
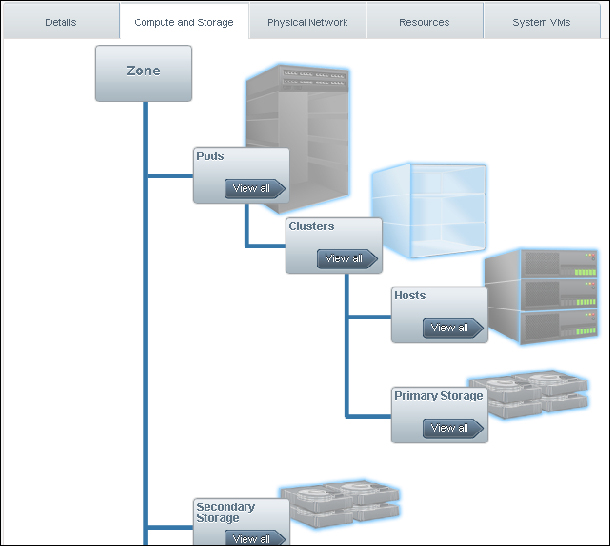
When we navigate to the Infrastructure page, it displays the overall capacity of Infrastructure that has been added to the cloud. The screenshot of the page is given as follows:
All the information about the number of Zones, pods, Clusters, and Hosts is provided on the screen. You can click on any button of View All to get the details about each component of the infrastructure.
We will start by adding a New Zone to our environment. For this we will have to move to the zone page and click on the Add New Zone button on the top right. The screen provides us with options to configure the zone we are about to add.
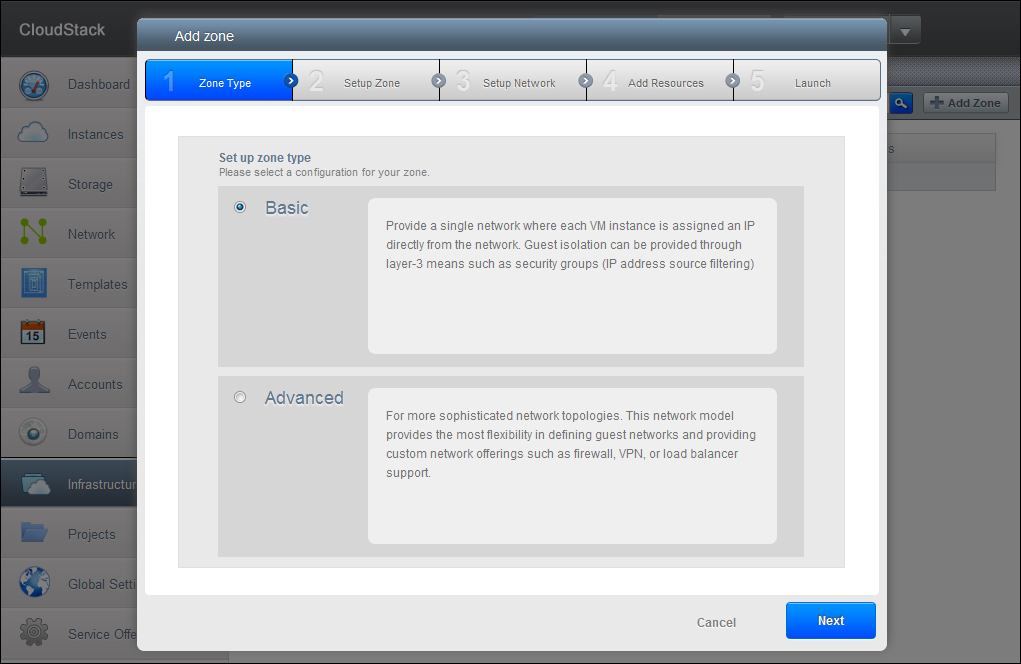
There are basically two types of configuration given as follows:
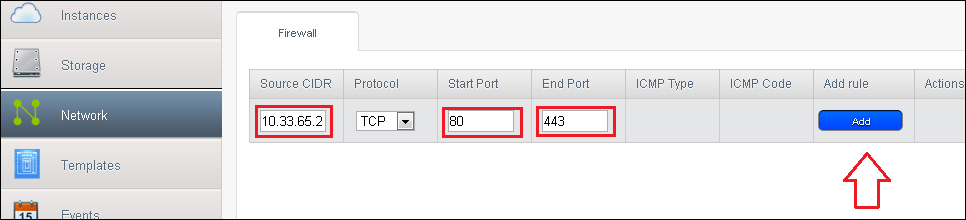
Basic: This type of zone is used for creating a zone with a single network in it. The virtual machines in this type of zone will be assigned IP address directly from that network. In this type of zone, guest isolation is provided using Layer-3 using security groups, that provides IP filtering based on the source IP address.
Advanced: This type of zone is recommended to be created for more sophisticated network topologies where the administrator can define guest networks and also provide custom network offerings such as firewalls, VPNs, or load balancer support.
We will first provide an overview of adding a basic type of Zone setup.
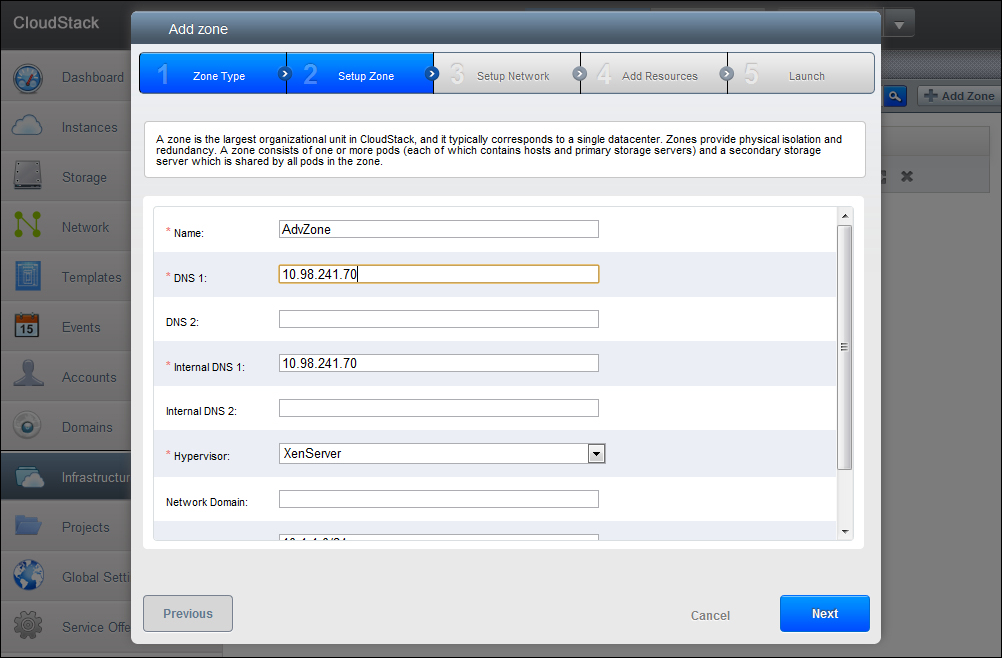
On selecting the Basic Zone type, move on to the next screen and provide details about the zone that we are creating. The configuration will involve the setting up and configuration of the zone properties such as:
Zone type
Network configuration of the zone—Public Network and traffic, configuration of one Pod, Guest traffic, and storage traffic
Addition of resources to the zone—one cluster, one host, one primary, and one secondary storage
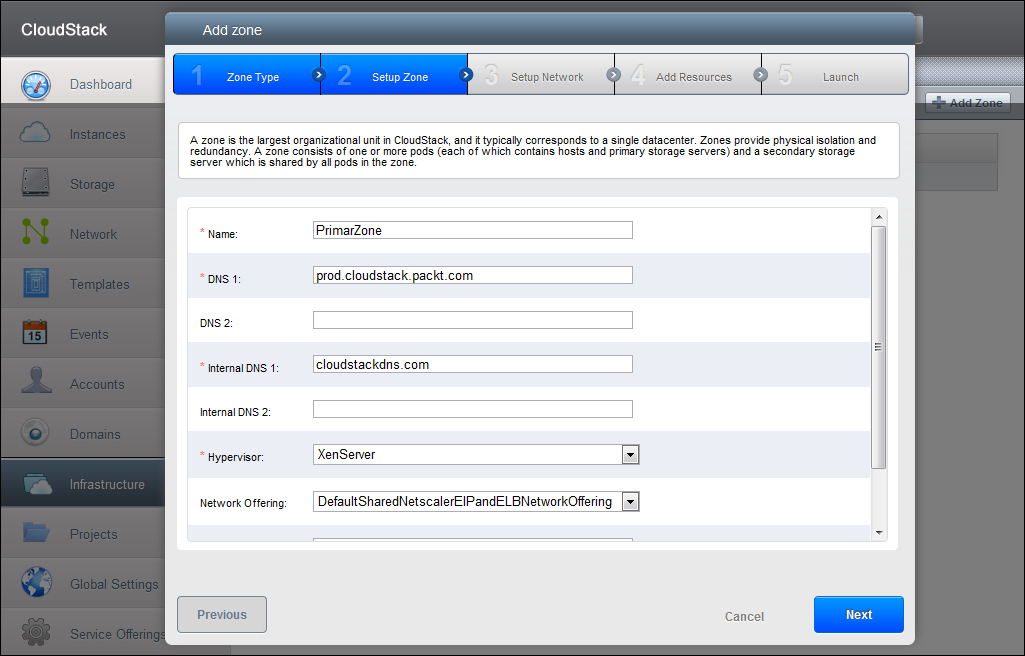
The parameters provided for adding a new basic zone are as follows:
Name: This is the name of the new Zone that we are creating.
DNS1: This is the primary DNS server that will be available in the Zone.
DNS2: This is an optional field. This is the second DNS server that will be used when the primary DNS server is not available.
These DNS servers are used by guest virtual machines in the zone and should be accessible by the public network that will be added to the zone at a later stage. The zone will also have some public addresses; the DNS servers must be accessible from these public addresses.
Internal DNS1: This is the address of the primary internal DNS server.
Internal DNS2: This is the address of the secondary internal DNS server, which will be used by the cloud only when the primary internal DNS server is down.
These internal DNS servers will be used by the system virtual machines in the zone. This DNS server will be accessed by the management traffic of the cloud. These DNS servers must be accessible by the private IP addresses in the pods of the zone that we are adding.
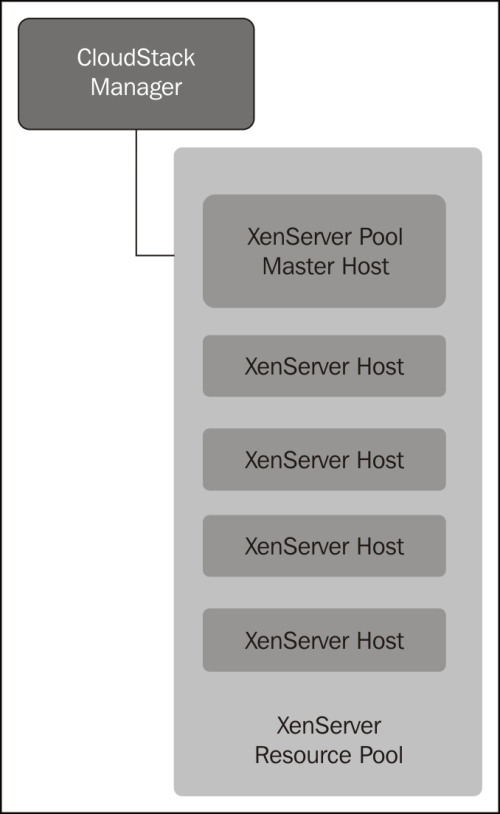
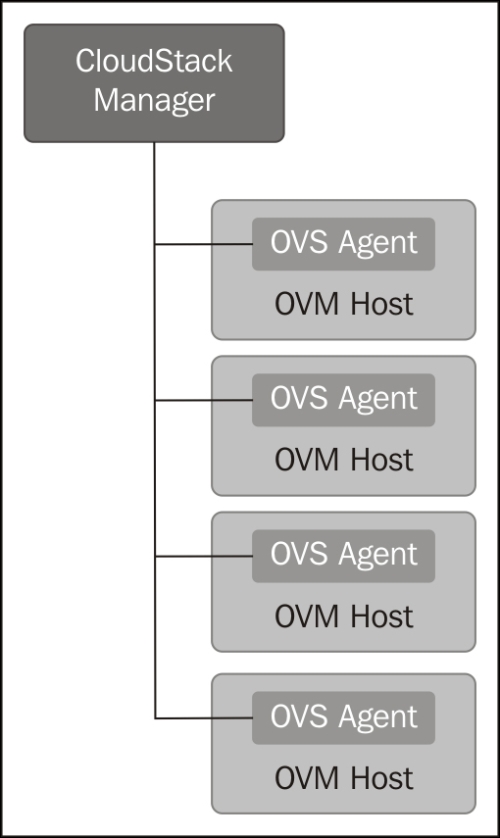
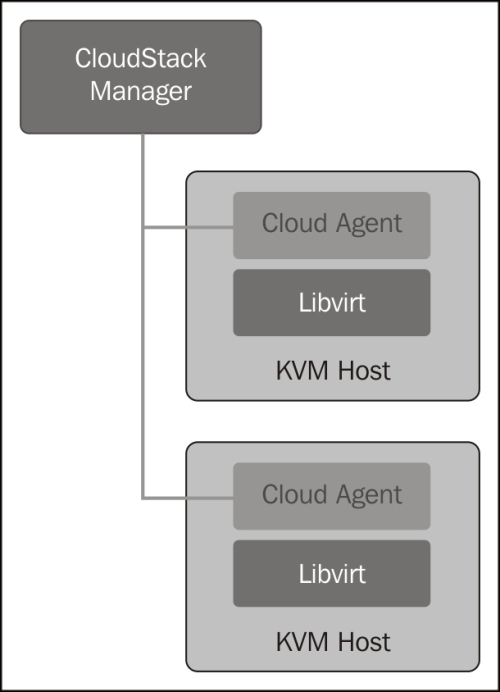
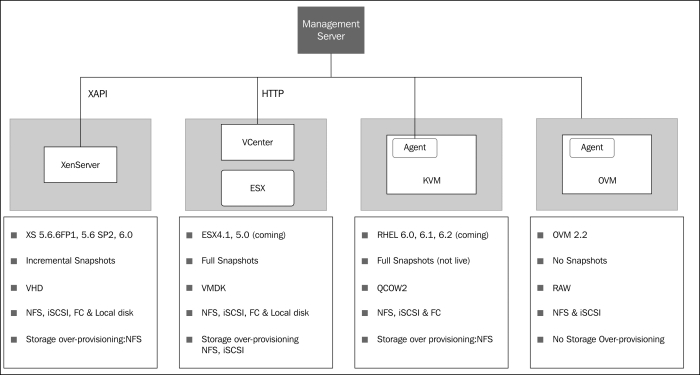
Hypervisor: Here we have the option of choosing the type of hypervisor that will be used in this Zone. We have the option to choose from the list, like XenServer, KVM, VMware, Baremetal, KVM, or OVM. The hypervisor that we select here defines the zone and is unique for the complete zone, i.e. only host with the same hypervisor can be added to this zone. If we need to add hosts with another type of hypervisor, we need to create a different zone for that hypervisor type.
Network offering: In this list are available various network offerings that we have created in the previous section of this chapter. The choice of the network offering will determine the type of the network services that will be available in the Zone for the guest virtual machines. These network offerings are defined in the network offering tab of the service offering page. The options available here are:
DefaultNetworkofferingWithSGServer: This network offering has security groups enabled for the guest virtual machines which will provide guest isolation to them. This network offering has other network services such as UserData, DHCP, and DNS.
DefaultSharedNetworkOffering: This network offering doesn't offer the support for the security group, so if you don't want the security group, choose this offering.
DefaultSharedNetscalerEIPandELBNetworkOffering: This network offering should be chosen when you have a Citrix NetScaler appliance as a part of the zone. This enables the usage of the Elastic IP address and Elastic Load balancer features provided by that appliance. You can create a basic zone with security groups enabled to offer 1:1 static NAT and load balancing.
Network Domain: The network domain can also be assigned here if you want a special domain name to be assigned to the guest VM. This DNS suffix will appear in the hostname of the guest VMs.
Public: This option specifies the scope of availability of the Zone to the users in the cloud. If it is selected, then all the users across all the domains will be allowed to create guest VMs in this zone. Otherwise, you can limit this zone scope to a particular domain, in this case only users belonging to that domain will be able to create guest VMs in this zone.
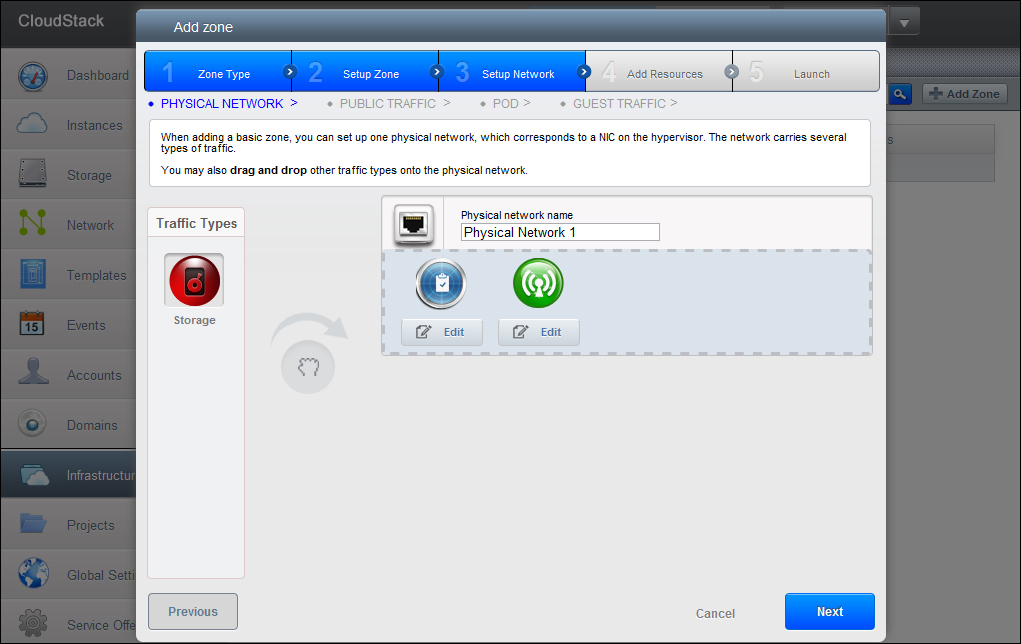
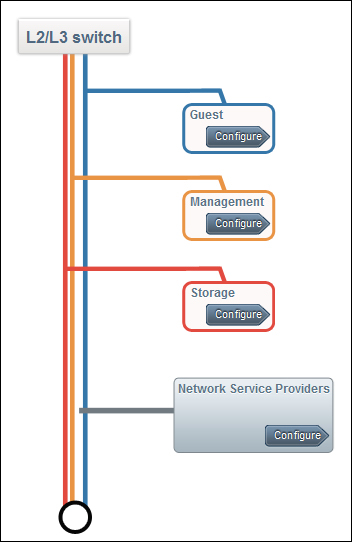
After all the options have been filled out accordingly, we will move to the next screen where we have to configure the physical network corresponding to the physical network interface card of the hypervisor.
You will have to set up one physical network which will carry multiple traffics. We can add the network traffic that will flow across this network. The network traffic can be any combination of the three types of network:
Management Traffic: This is the traffic between the CloudStack's internal resources. All the communication from any resources that communicates to the Management Server such as Hosts and System VMs is categorized as Management traffic.
Traffic between CloudStack's guest VMs: The communication of guest VMs in the CloudStack is categorized as this kind of traffic.
Storage traffic: All the traffic between the secondary storage VM and the secondary storage such as VM templates and snapshots is categorized as the storage traffic.
We can edit the labels to be used for these individual traffics by clicking on the Edit button. These labels are text strings that the CloudStack matches for different kinds of traffic with the traffic label that is already defined on the hypervisor host. These labels are defined just for the first hypervisor host that will be selected for the first cluster, for any other hosts, labels can be added once the zone has been created.
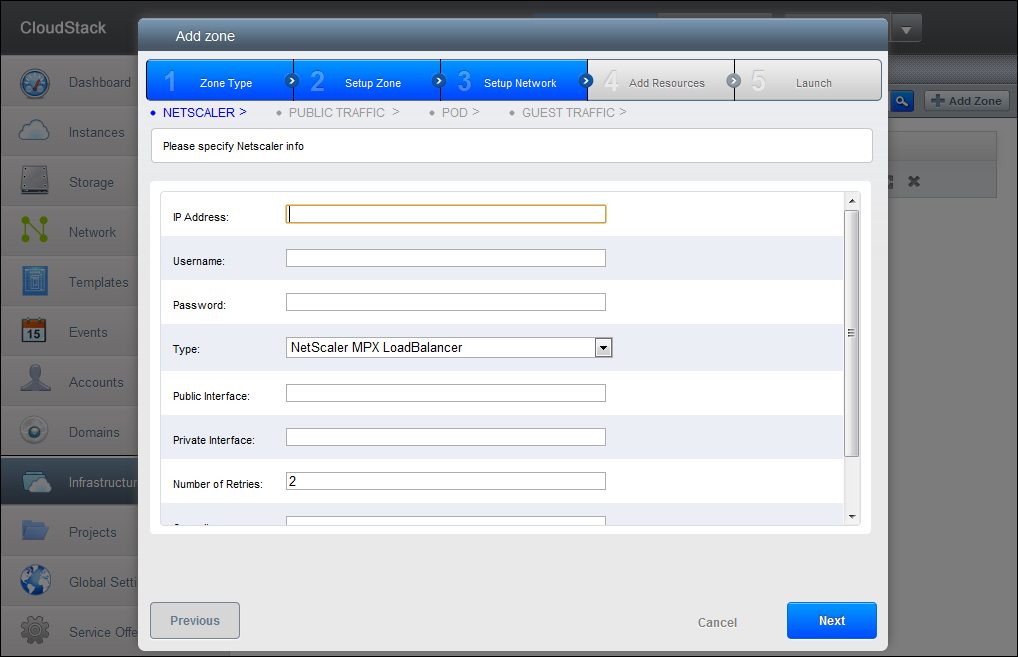
The users can also select different Network offerings such as DefaultSharedNetscalerEIPandELBNetworkOffering, in which case the users will have two extra screens to fill in that consists of the NetScaler device configuration. This network offering has various services supported with it as User Data, DNS, load balancer, and Elastic IP, and these options are for configuration of the network carrying traffic between end users' virtual machine and internet—public traffic. In this case you must enter the configuration details for the NetScaler device, as shown in the following screenshot:
The options displayed while adding a NetScaler device are as follows:
IP address: The IP address of the NetScaler device (NSIP)
Username: Username for the login of NetScaler device
Password: Password corresponding to the username specified above for the Netscaler device
Type: The NetScaler device type which you are adding, It is the list of values such as NetScaler VPX, NetScaler MPX, or NetScaler SDX
Public Interface: The interface of the NetScaler which is a part of the public network
Private Interface: The interface of the NetScaler device which is configured to be a part of the private network
Number of retries: This is the number of times a command should be retried before it is considered to have failed
Capacity: This specifies the number of guest networks/accounts that will share this NetScaler device
Dedicated: This option makes the device dedicated to a single account. If this option is selected, the value in the capacity field is taken to be "1" irrespective of what is specified
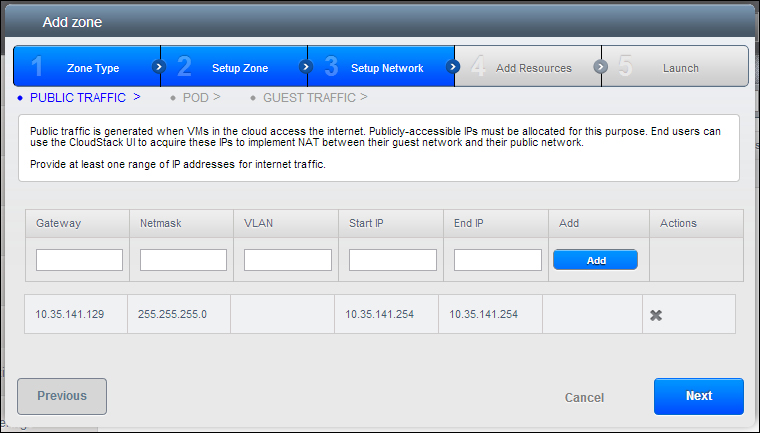
After you have configured the NetScaler device details, you will be asked about the details of the public traffic—the IP range for the public traffic is to be provided. These IP addresses will be used to provide static NAT capability. These capabilities are enabled while selecting the Network offering for NetScaler with EIP and ELB. The screen on the next page looks like this:
The options for setting up the public traffic in the network setup of a basic zone are:
Gateway: The address of gateway to be used for these IP addresses
Netmask: The netmask associated with this IP range
VLAN: The VLAN which is to be used for public traffic
Start IP/End IP: This is the range of the IP addresses that are Internet facing and are to be allocated for access to the guest VMs so that they can access the Internet
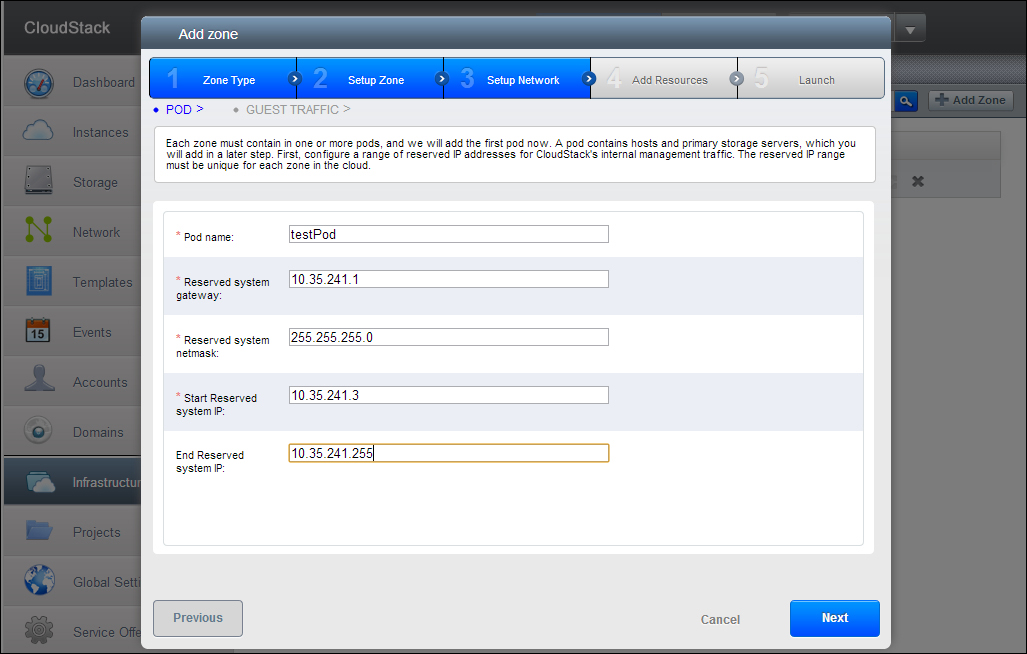
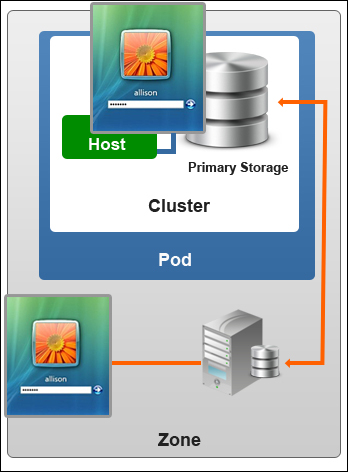
After we have configured the physical network and NetScaler device configuration, the next step is to add pods to this zone. A zone can contain multiple pods. For more details, refer to Chapter 1, Apache CloudStack Architecture.
We will have to add the first Pod where we will configure a range of reserved IP addresses for CloudStack's internal management traffic which should be unique for each zone in the cloud. Later, after the creation of zone, we can add more pods.
Name: This is the name of the Pod which we are adding.
Reserved System Gateway: This is the gateway for the hosts in this Pod.
Reserved System Netmask: This is the network prefix which will define this Pod's subnet. We have to define an IP range here using CIDR notation.
Start/End Reserved System IP: This is the IP range which will be used for the Management traffic. This IP range will be used by CloudStack's Management server for managing various System VMs, secondary storage VMs, Console Proxy VMs, and DHCP over the Management traffic.
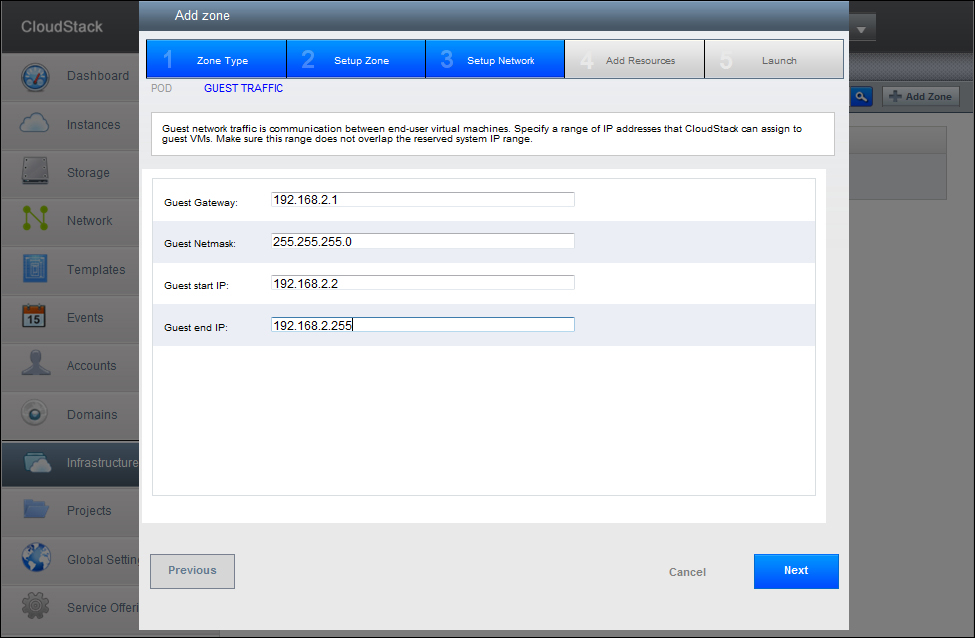
After adding the first Pod by providing the required values, we will proceed to configure the guest traffic. Clicking on the Next button brings up the next screen for configuring guest traffic:
The Storage traffic options are:
Guest Gateway: This is the gateway that the guests use.
Guest Netmask: This is the netmask of the subnet which will be used by the guests.
Guest Start/End IP: This is the first and the last IP addresses of the IP address range which will be assigned to the guests by CloudStack.
CloudStack recommends using multiple NICs which allow the NICs to be in different subnets. In case you use only one NIC, these IP addresses must be in the CIDR range of the Pod.
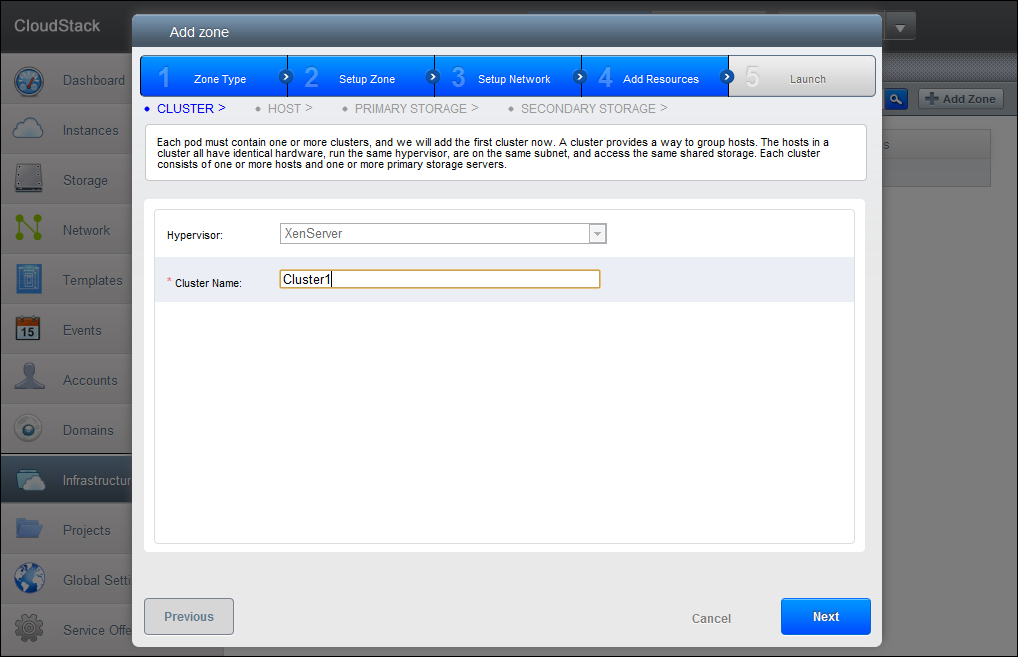
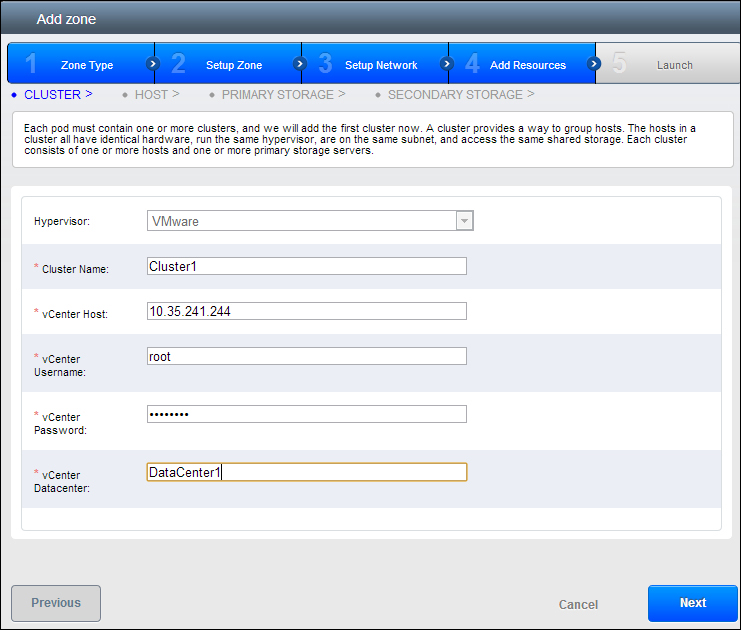
After the guest traffic has been set up, we will add the first clusters of the hypervisor type we have defined earlier. On clicking the Next button, we get the following screen:
The Cluster details are entered in the options given as follows:
Hypervisor: This is the type of the hypervisor which we selected earlier. This is the hypervisor which all the hosts in the cluster will use. Different fields may need to be filled in based on the selection of the type of hypervisor. In case we are using VMware as the hypervisor, it is recommended to create the cluster in vCenter and then add it here.
Name: This is the name of the first cluster that we are configuring here. This is the first cluster that we are adding to the cloud, if you want to add more clusters, you can do that after the creation of the zone. After this first cluster is added, we have to add hosts to the zone. A cluster can have multiple hosts of same hypervisor type which hosts the guest VMs. We will add the first host here and for any more addition of hosts, we can do that after the creation of this zone. The host we are adding must have a hypervisor running on it with an IP address configured and must be connected to the Cloudstack Management server.
The host configuration values are provided in the options given as follows:
Hostname: This is the DNS name of the host.
Username: This is the username of the host, usually "root".
Password: This is the password for the user specified in the field above.
Host Tags (optional): This can be any tag which will be used to categorize the hosts for the sake of maintenance.
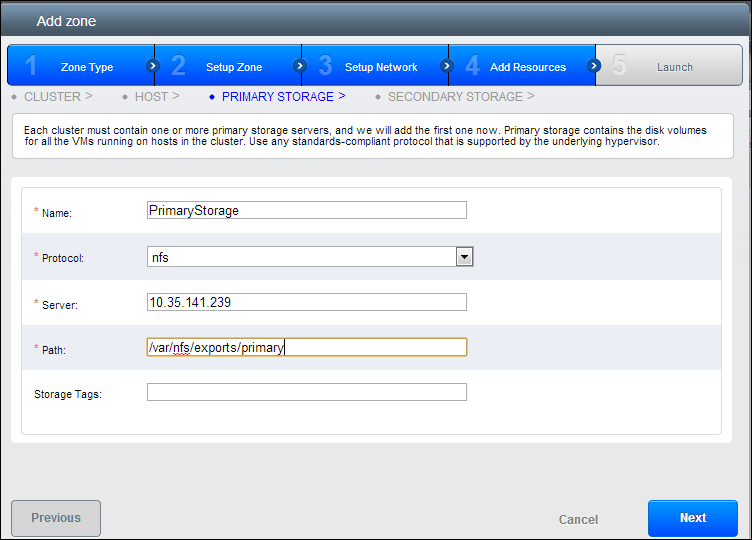
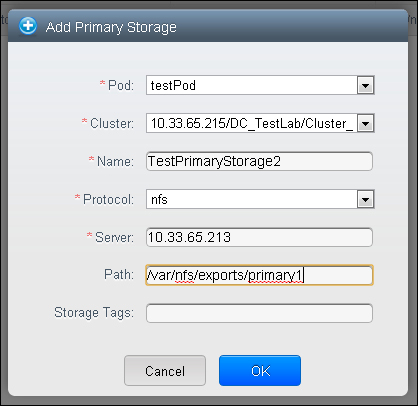
This will add the first host to the Zone. The next screen on clicking Next lets us add the primary storage server. Each host has at least one primary storage server.
The options for adding primary storage in the zone are:
Name: This is the name of the first primary storage server that we are adding here.
Protocol: This field is dependent upon the type of hypervisor we are using. In the case of XenServer, we have the option to choose from NFS, iSCSI, or PreSetup. In case of KVM, we can choose the protocol for the Primary storage server as NFS or SharedMountPoint. For vSphere, we can use either VMFS, which can be iSCSI or FiberCannel or NFS. Depending upon the selection of this field there can be other fields in this screen.
If we select an NFS server, the path is the location of the Primary storage on the server.
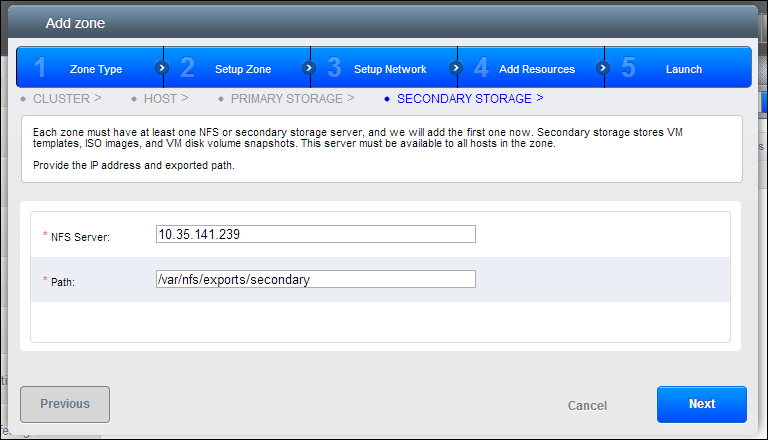
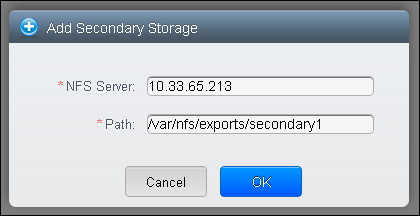
Next we have to add the secondary storage to the zone. The secondary storage can be accessed by all the hosts in all the cluster of the Zones and is used to store templates, ISO images, snapshots, and so on. On moving to the next screen we get:
The options include:
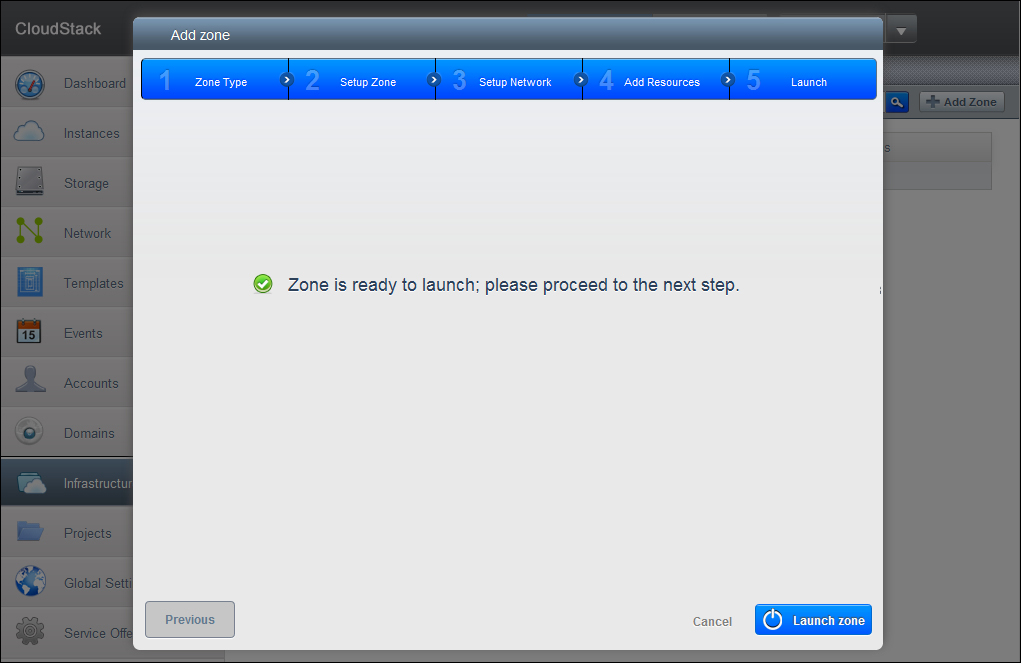
After the addition of secondary storage, we are done with the configuration of the zone, and we can launch it.
This was the configuration of the Basic Zone type. Let's see how it is different from the Advanced Zone configuration and what extra configuration inputs are required in order to create a zone with advanced network topologies.
Advanced Zone configuration
When you select the option of creating a zone of Advanced type in the first screen of the Zone, you will get a screen like the one shown below.
The basic information of the advance zone is provided for the following parameters:
Name: Name of the advanced zone that we are creating.
DNS1/DNS2: This is the address of the primary and secondary DNS server to be used by the guest VMs in the zone. These servers should be accessible by the public network that we add later.
Internal DNS1/Internal DNS2: These are the DNS servers that are used by the system VMs in the zone.
Network Domain: This is an optional field and should be specified if you want a special domain name for the guest VM network.
Guest CIDR: This field is the CIDR IP range that describes the IP addresses to be used by the guest virtual networks in this zone. It is recommended that the guest CIDR IP range should be different for different zones.
Hypervisor: This is the list of hypervisor for the first cluster in this zone. Once the zone is created, you can add multiple clusters with hosts of different hypervisors. A cluster is a group of homogenous hypervisor hosts, i.e. all the hosts in a cluster must have the same type of hypervisor.
Public: This field specifies the permissions for the zone, whether this zone is to be assigned to all domains or a particular domain. If this zone belongs to one domain, then users who belong to that domain, will only be able access it.
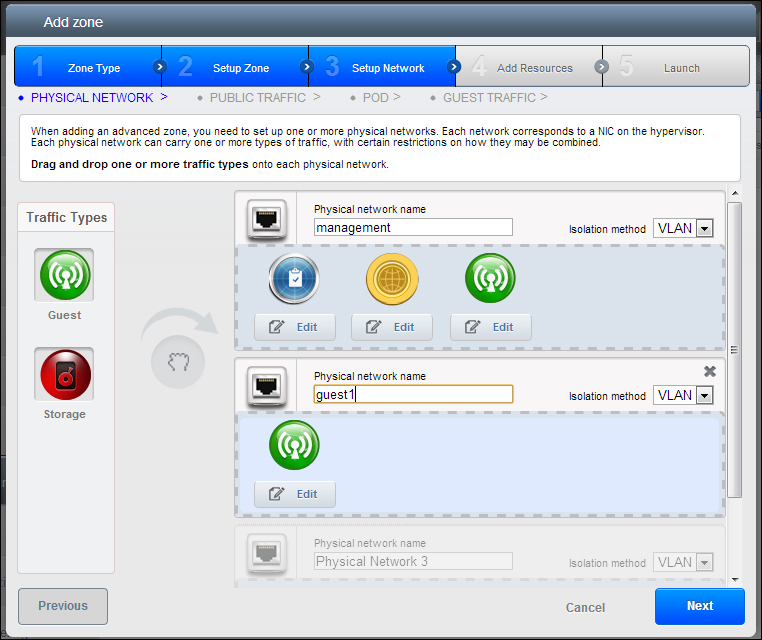
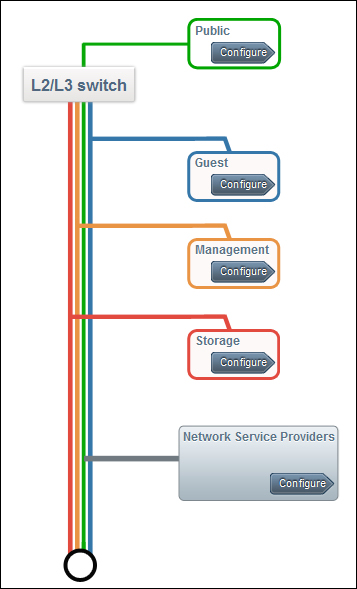
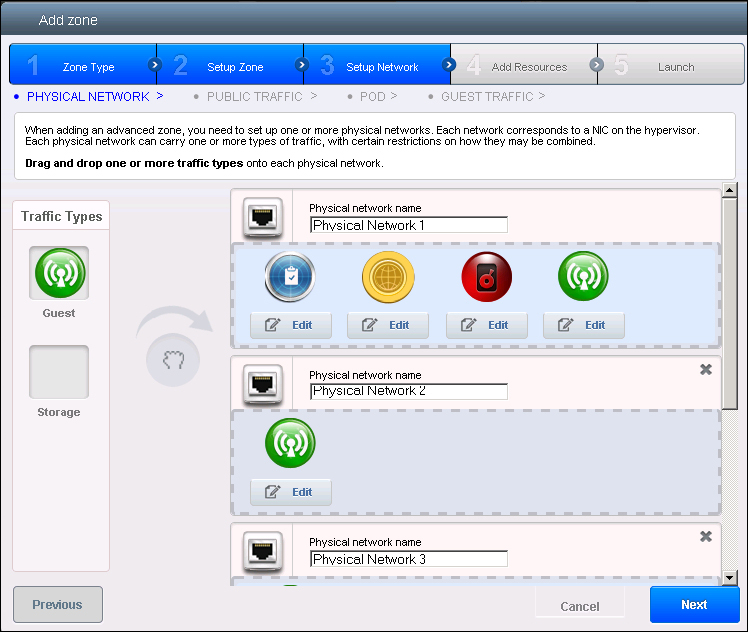
After configuring the initial details, you have the option to add multiple physical networks and configure which traffic can flow across them. In this case, you will have to define labels to distinguish different kinds of network traffic.
As you can see in the preceding screenshot, there are three traffic types in the first Physical Network and then there can be number of physical networks which allow traffic between the guest VMs. Each of these traffic types must have a label associated with them in order to distinguish between the different types of network traffic.
These labels must match the labels that you have defined on the hypervisor host. Only one physical network can host the storage traffic, internet traffic and Management traffic. This configuration is done only for the first hypervisor host that is added to the zone, for any other host it can be done after the zone has been created.
After you have assigned various traffic types to the different physical networks, you will have to configure the NetScaler device in the zone as per the Screen 15 of the Basic Zone configuration in the previous section.
You will have to follow the steps from screen 15 to screen 17 to add the Pod in the CloudStack environment as defined in the Basic Zone configuration. After adding the Pod to the environment, you will be asked for configuring the VLAN range for the various physical network that you have defined for carrying the guest traffics for each physical network.
The screen for defining the VLAN range for the various physical networks in this zone is given above. After defining various VLAN ranges for different kinds of traffic, you can proceed to the configuration of pods, Clusters and Hosts in the zone same as described for the Basic Zone.
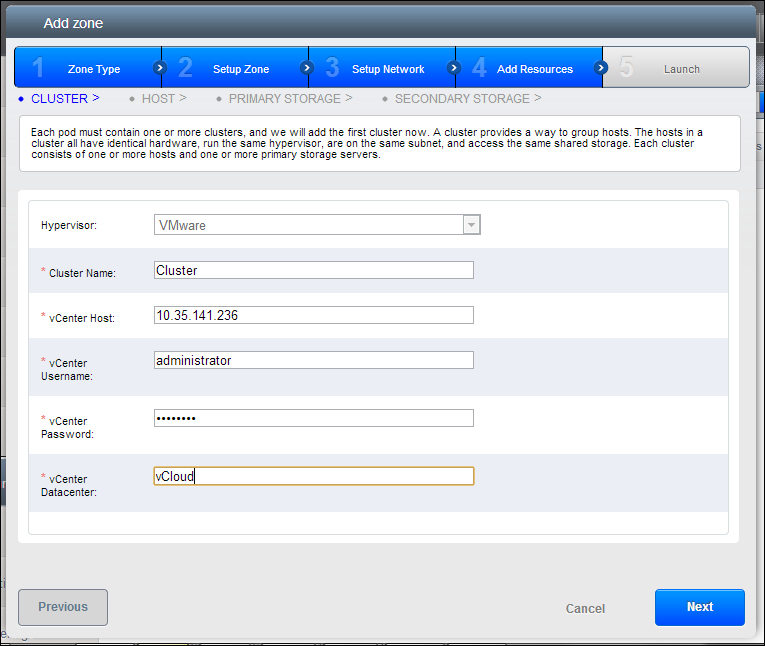
There can be various other configuration parameters depending upon any other network offerings than those defined in this chapter or it can depend upon the type of hypervisors such as if you select VMWare, you will be asked to enter the details of the VMware VCenter server while defining the details of the cluster (A cluster consists of homogenous hosts—the hosts must have the same type of Hypervisor), as depicted in the following screenshot:
For VMware, it is recommended that you have the cluster defined at the VCenter server before adding it to the CloudStack environment.
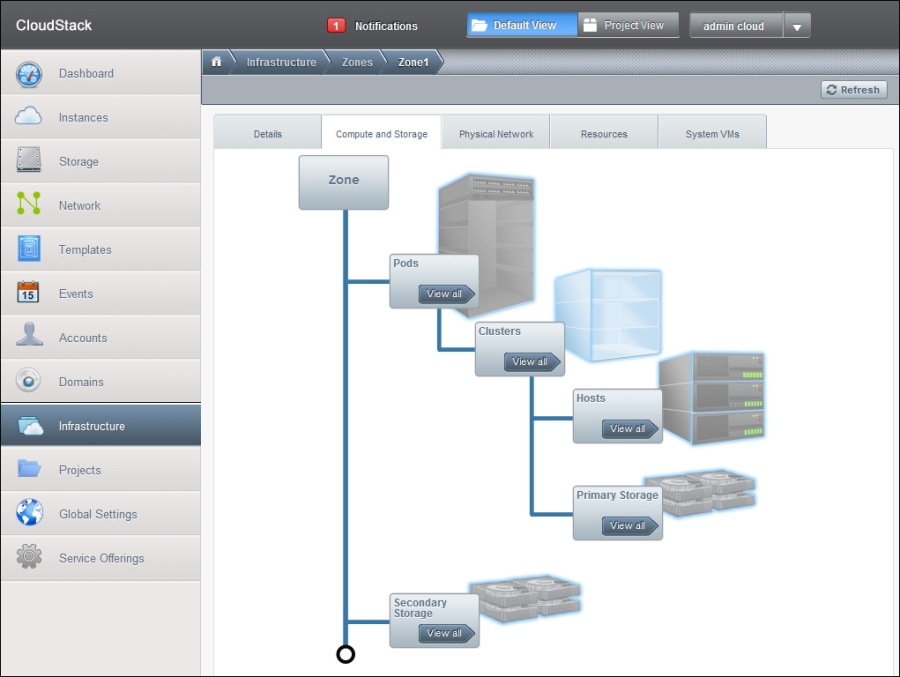
After the successful creation of the zone, you can view the details of the same on the zone page and also edit some of the options. The page displaying the details about the zone will look somewhat like this:
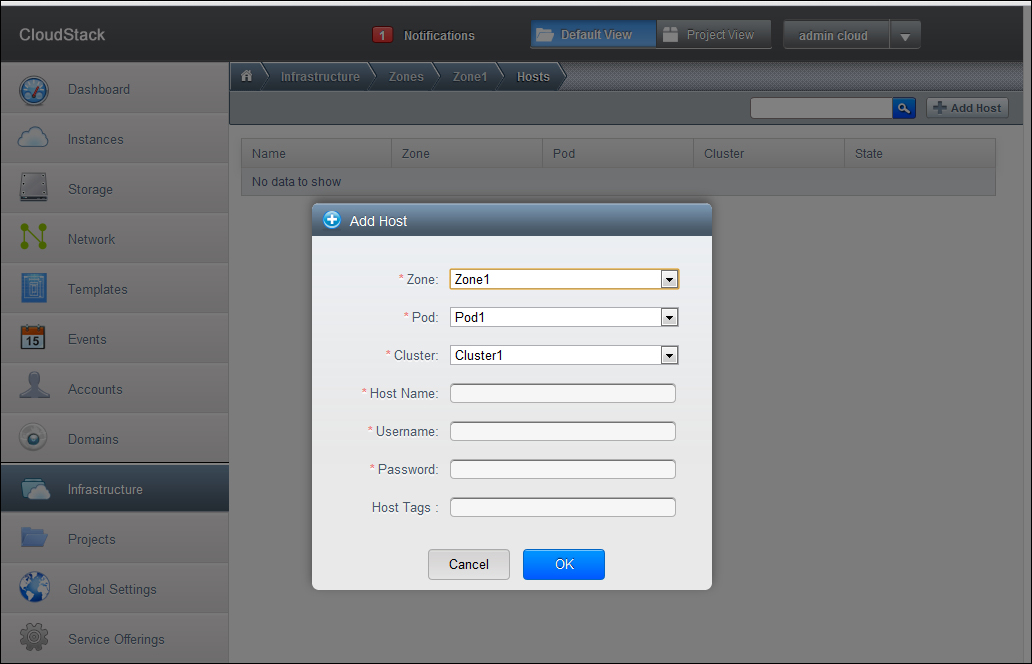
You can also add more infrastructure resources to the zone or create another zone after this zone is created. For example, lets say you want to add another host to the zone, it can be done by moving to the host page and clicking on Add Host which will provide you with a screen to enter the details about the new host.
The options for adding another host in the zone are:
Zone: This is the zone to which we are adding our new host to.
Pod: The pod in the zone selected above in which the host should lie.
Cluster: The cluster within the pod which the host is a part of.
Hostname: The IP address or hostname of the host which is to be added.
Username: The username of the host.
Password: The password of the host for the username provided above.
Host Tags: This can be any tag to distinguish the host for ease of maintenance.
Similarly we can add more clusters or pods to the existing zone by navigating to the desired resource page. We have added the infrastructure to the cloud; we can proceed to adding other resources such as templates and storage.
A template can be created by a number of ways. We are going to discuss them below.
Creating a template using a running VM
We can create a template from a running virtual machine in our environment by following these steps:
Create a VM instance with the Operating system that you want and make the configuration changes as per your need.
Stop the running virtual machine.
Now, the volume of this virtual machine is also in the stopped state, convert this volume into a template.
Or, create a snapshot of this volume and then create a template from that snapshot.
Importing a VM to CloudStack
The other way to create a template is to import a virtual hard disk from any other environment into the CloudStack environment.
There are some basic requirements while creating a template from any other environment which enable some functionalities such as the console view and guest shutdown. The requirements are as follows:
If you are planning to import a XenServer virtual machine, install the PV drivers or Xen tools on each of the machine which you are going to import into CloudStack and convert into a template. The PV drivers or the Xen tools help manage the virtual machine and also provide performance data for them.
If the virtual machine is part of a VMware environment, install the VMware tools.
We will discuss the steps for importing a template of different OS and different environment later in this book.
Creating a template using the Management console
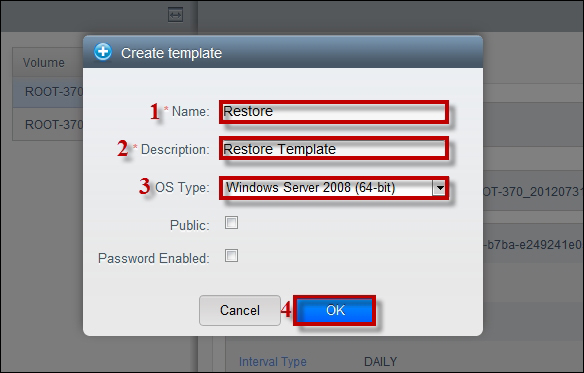
We can as well create templates using the Management console by navigating to the Templates tab of the left menu and clicking on the Create Template button. The screen looks as follows:
The options while creating a new template are:
Name and Description: This contains the name and description of the template that we are creating. This will be visible to the end users while creating VMs from the template.
URL: This asks for the URL of the file (which can be a VHD or a compressed file) which is going to be used to create template and then guest virtual machine from. This file is uploaded to the CloudStack environment. HTTP and HTTPs are supported protocols for this.
Zone: This is a drop-down list of zones in the environment, you can either create template to be used in all the zones or for some specific zone.
Hypervisor: Select the hypervisor to which the file belongs.
Format: This is the format of the template file that we are providing URL for. The format of the template depends upon the type of hypervisor we chose for it.
OS Type: The operating system of the template we are creating. This will help CloudStack to perform a set of operations and will also help in improving the performance of the guest VM created from this template. In case the OS type is not present, you can choose Other.
Extractable: Specified whether the template is extractable or not. If it is extractable, the full image can be available for download by the end users.
Password Enabled: Check this if the template supports the password reset feature.
Public: Specifies whether the template is to be made public or not.
Featured: It should be checked only if you want to make this template a featured template more prominent for users to select from the list.
By providing the valid values, the template will be created and you can create new guest VMs based on this template.
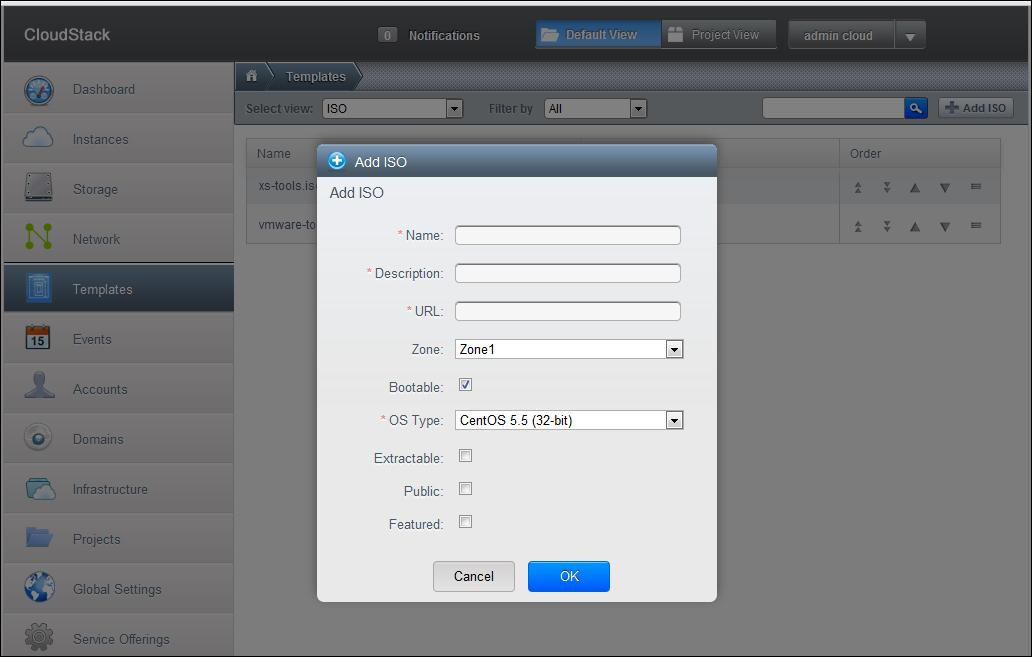
After adding a template from the console, you can also add the ISO to CloudStack. CloudStack also supports adding ISO images to the guest VMs by uploading them to the CloudStack environment. To add a new ISO, select the ISO from the drop-down menu on the Templates page and click on the Add ISO button. This will open a pop-up box to allow you to fill in the details shown as follows:
The options available while adding an ISO are as follows:
Name and Description: The name and description of the ISO that we are adding.
URL: The ISO that we add in CloudStack is uploaded, so they must be available on a URL. HTTP/HTTPs is the supported protocol for this.
Zone: Choose the zones to which the ISO must be available.
Bootable: This property specifies whether the ISO is bootable or not. This property specifies whether the guest VMs can boot off this ISO image or not.
OS Type: The type of the OS that the ISO has. You can choose other if the OS is not listed in the list. This helps CloudStack to perform certain operations as well as improves the performance of the guests.
Extractable: This property specifies whether or not the ISO can be extracted. This means that the ISO can also be available for extraction.
Public: Specifies whether to make the ISO public or not.
Featured: This option must be selected if you want this ISO to be more prominent, so that users select it from the list.
These templates and the ISOs that we add in the CloudStack environment can be used to create instances. The end users, while requesting a new instance, specify the template or the ISO which is to be used to create the instance in the zone.
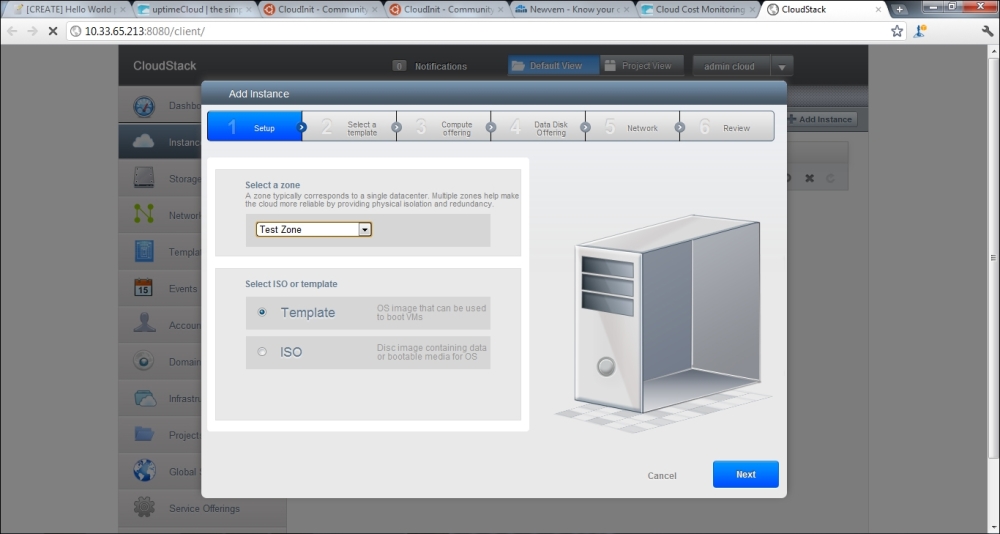
We are done creating projects, domains, accounts, and users in our CloudStack environment and as we have added infrastructure to our cloud. Now, if the end users request an instance based on some template or ISO, they will specify the zone in which the instance should be created along with the service offerings and networks. These options are listed according to our configuration in the cloud. For example, the compute offerings that you have added will be listed for the user to select from.
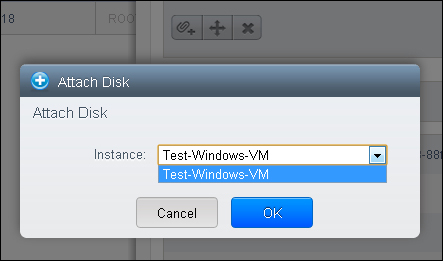
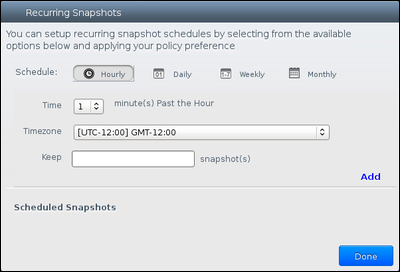
The administrator can also perform all the operations that the user is entitled to. The admin or the user can request storage volumes based on the disk offering that we have added to our CloudStack environment, these volumes are provided to the users from the primary storage of the hosts that we add in our infrastructure. These volumes can be attached to the guest anytime.
When we add a host to our infrastructure, CloudStack installs an agent on the hosts, so that it can communicate with and control the environment. We can install an agent on the host using the following command line:
For Rhel/Centos:
For Ubuntu:
The installation of the agent on the host is the part of the host preparation tasks that we carry out so that the hosts can be added to our environment and the guest VMs can be provisioned on these hosts.
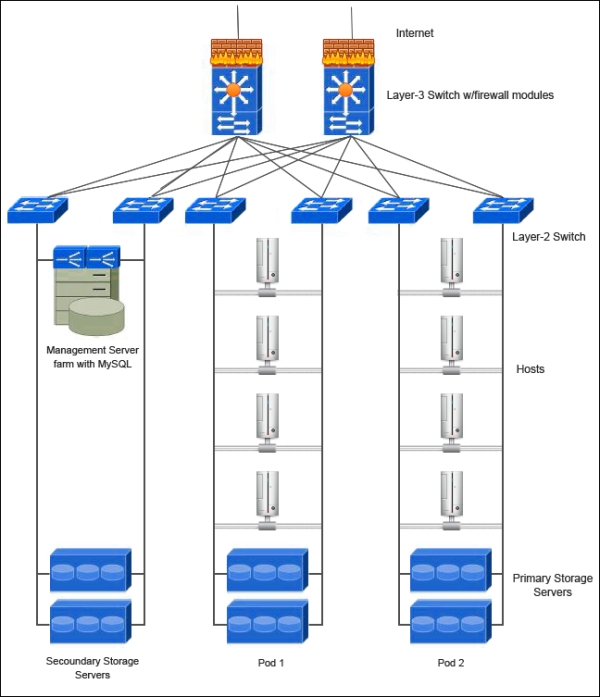
The hosts added to the Cloudstack environment provide the following functionalities:
They provide compute—CPU, Memory, storage and networking resources to the guest VMs hosted on them.
These hosts also provide interconnectivity to the Internet using high bandwidth TCP/IP network.
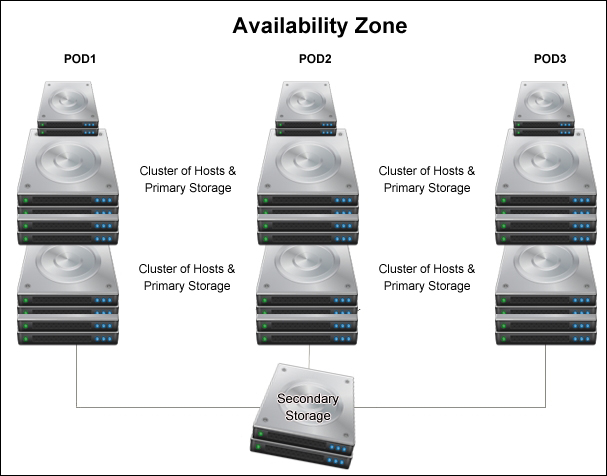
These hosts can be residing across multiple data centers but are grouped under a logical entity called
cluster. A cluster is a group of homogeneous hosts. The hosts in a cluster must have same hypervisor installed on them.